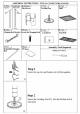
ASSEMBLY INSTRUCTION TOTAL CLOSET ORGANIZER Rod / > [A-PCs [[TA-8 pes | B-48 Pairs | C-PCs | D-PCs | Topeka [Ponemiske™ Slip Sleeves Leveling Feet Shelf Pastie E:mw cap Connect Bottom 4 pes F-4 pcs G-4 pes H-2 pes Hanging Rod Bracket |Screw (for Hanging Rod)| . SLEEVE Top Shelf / I apes | J-apes | Assembly Tools Required: Expandable Hanging | PP Sheet Phillips Screw Driver > 9 Step 1 Screw the top @ Step 2 Screw the Lev each pole. (A) and bottom (AA) Pole together.
Step 3 Fasten Slip Sleeves (B) around the bottom double groove of each pole. If necessary, move the sleeves slightly up or down until it snaps into position. Helpful Hint: The shelves can be fully adjusted ser ser e swe wer | increments. For your convenience, the suggested shelf o—r—x—x—x—3 ) | heist and bracket location are indicated with double grooves on the poles. Step 4 Slide Shelf (D) over the top of the poles and secure tightly over the slip sleeves.
| Step 8 Fasten Slip Sleeves (B) at the 6th set of double grooves on the inner poles. Slide the Hanging Rod Bracket (E) over the poles and secure tightly. Step 9 Fasten Slip Sleeves (B) around the top set of double grooves of each pole. Slide the Top Shelf (H) over the poles and secure tightly. Step 10 Repeat step 1-9 to assemble the second tower. Step 11 Place U-sleeve (G) in the center of each Hanging Rod Bracket (E).
CLOSET CONFIGURATION Crr ..:i ufiwmq Er res % = @.
g Wall Strap Instructions Notice: To prevent possible tipping, it is suggested wall straps be installed. For safe mounting, secure wall straps to wood studs whenever possible. QTY| PARTS LIST: 00 HE 2 pes A-Nylon wall Strap 4 pes | B-Dry-wall screw C-Wall anchor Susanne Note Tools ® Philips screwdriver Power drill For safe mounting, it is essential 10 use the proper hardware for our wall type {drywall, concretion) Contact your local hardware store for assistance if Necessary.