
User guide


74 CHAPTER 7 LANES & STOP BARS
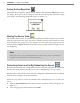
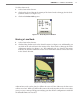
Figure 7.11 – Zoom In Feature
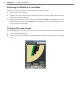
Aer you click on Adjust Bins or Adjust All, the Sensitivity Slider window will appear (see
Figure 7.12). Click on the up/down buttons to change the sensitivity (in decibels). Negative
values will lower the rejection threshold in order to increase sensitivity; positive values will
increase the rejection threshold in order to decrease sensitivity.
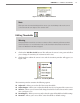
Figure 7.12 – Sensitivity Slider Window
Automatic Configuration
Use the following steps to auto-congure the SmartSensor Matrix:
1 Move the sensor to the appropriate location by clicking the button.
2 Click the button to clear the edit area.
3 If necessary, restart Automatic Lane Conguration by clicking the button and se-
lecting Restart Auto Lane Cfg from the window. Allow the intersection to cycle at least
twice before proceeding (this will take approximately 5 to 10 minutes).
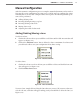
4 Capture lanes & stop bars to edit area.
5 Make any necessary manual adjustments.
6 Save the desired changes to the sensor.
Note
Lanes have a direction shown by white arrows on top of the lane. To switch the lane
direction, simply click on the arrows. (To be able to change lane direction, there must
not be any display overlays on.) Before you save the configuration, make sure that all
the arrows are pointing in the correct direction.