
User guide


46 CHAPTER 4 INSTALLING SMARTSENSOR MANAGER MATRIX
wireless link.
Follow the steps below to use the Click 421 to communicate with the SmartSensor Matrix:
1 Rock the Click 421 device onto the green T-bus to the le of the gray T-bus connector
on the second DIN rail on the backplate.
2 Make a wired (using the serial port on the front of the device) or wireless (Bluetooth)
connection between the Click 421 and the handheld computer.
If you wish to establish a wired connection with a laptop computer instead of the handheld
device, use the laptop’s native RS-232 serial port to connect to the Click 421, or a USB-to-
serial converter if the laptop does not have an RS-232 serial port. You can also establish a
Bluetooth connection from your laptop to the Click 421. To do so, consult your laptop’s
soware guidelines on how to discover Bluetooth devices and congure a Bluetooth serial
connection.
An RJ-11 patch cord with a pigtail on one end can be wired to the RS-485 screw terminal
on the Click 421 and used to patch into RJ-11 sockets on the rack cards or backplate for
troubleshooting.
Once you’ve connected to the Click 421, you can connect to the sensor using SmartSensor
Manager Matrix, as outlined in the next chapter.
Installing SSMM
You can install SSMM to your Windows OS device. Everything needed for this installation
is contained in the SSMM Setup.exe le.
Note
You must have Administrator rights to run the setup program.
Follow these steps to install SSMM:
1 To download the install le, go to the Wavetronix website at www.wavetronix.com.
2 Click the Support link near the top of the page and follow the controls to nd the cor-
rect link for the SmartSensor Manager Matrix install le.
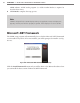
3 Once you’ve downloaded the le, double-click on it. Opening it executes a setup pro-
gram that will copy all the necessary les to the hard drive and place icons in the Start
menu and on the desktop (see Figure 4.1).