
User Guide


MPLAB
®
PICkit™ 4 USER’S GUIDE
2018 Microchip Technology Inc. DS50002751C-page 53
Appendix A. Debugger Function Summary
A.1 INTRODUCTION
A summary of the MPLAB PICkit 4 in-circuit debugger functions is listed here.
• Debugger Selection and Switching
• Debugger Options Selection
A.2 DEBUGGER SELECTION AND SWITCHING
Use the Project Properties dialog to select or switch debuggers for a project. To switch
you must have more than one debugger connected to your computer. MPLAB X IDE
will differentiate between the two by displaying two different serial numbers.
To select or change the debugger used for a project:
1. Open the Project Properties dialog by doing one of the following:
- Click on the project name in the Projects window and select File>Project
Properties.
or
- Right click on the project name in the Projects window and select “Properties”.
2. Under “Categories” on the left side, expand “Conf:[default]” to show PICkit 4.
3. Under “Hardware Tool”, find “PICkit 4” and click on a serial number (SN) to select
a debugger for use in the project, then click Apply.
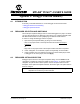
A.3 DEBUGGER OPTIONS SELECTION
Debugger options are set in the Project Properties dialog. Click on PICkit 4 under
“Categories” to display the “Options for PICkit 4” (see Figure A-1). Use the “Options
categories” drop list to select various options. Click on an option name to see its
description in the Option Description box below. Click to the right of an option name to
select or change it.
Note: The available option categories and the options within those categories are
dependent on the device you have selected.