AlphaBot User Manual share awesome hardware AlphaBot User Manual Nov.
AlphaBot User Manual share awesome hardware To the Reader Recommendation Reading this document can be a challenge for a freshman. We advise that the reader need to have some knowledge of the programming in Raspberry Pi Python or Arduino, which can be helpful for understanding the programming fundamentals. Due to space constraint, only a few of the programming fundamentals can be explored here. If you want to have a thorough understand of them, please check the source code.
AlphaBot User Manual share awesome hardware Contents AlphaBot User Manual 1 To the Reader 2 Recommendation 2 How to get data 2 Contents 3 Product description 5 Introduction 5 Functions 5 Features 5 Audience 6 On-board resource 8 Module functions 9 Main control module 9 Motor driver module 10 Power supply 12 AD sampling chip 12 Obstacle avoidance module 14 Speed testing module 15 Infrared remote control 16 Ultrasonic distance measurement module 3 18
AlphaBot User Manual share awesome hardware Servo 21 Tracker module 23 NRF24L01+wireless control 25 Bluetooth control 27 ZigBee control 29 Wifi video monitoring 30 Example programs Arduino example program 31 31 Raspberry Pi example program 37 Arduino and raspberry Pi combined control 49 Safety Precautions 52 Notice Please reserve the following information for future use.
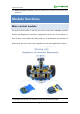
AlphaBot User Manual share awesome hardware Product description Introduction Mobile robot development platform, compatible with Raspberry Pi/Arduino Functions AlphaBot is a robotic development platform compatible with Raspberry Pi and Arduino. It consists of the AlphaBot mainboard, the mobile chassis, and everything required to get it moving.
AlphaBot User Manual share awesome hardware Arduino extend header, supports Arduino shields Modular design, plug-and-play modules like line tracking, obstacle avoidance, speed measuring, etc. eliminating the trouble of connecting mess wires.
AlphaBot User Manual share awesome hardware this paper. If you have any question, please don’t hesitate to visit Waveshare site http://www.waveshare.com and leave your message.
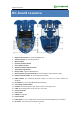
AlphaBot User Manual share awesome hardware On-board resource 1. 2. 3. 4. 5. 6. 7. 8. 9. 10. 11. 12. 13. 14. 15. 16. 17. 18. 19. 20. 21.
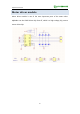
AlphaBot User Manual share awesome hardware 22. Raspberry Pi/Arduino selection: select the Raspberry Pi or Arduino to control the robot peripherals Module functions Main control module The main control module is the key part of the smart robot. AlphaBot provides Arduino and Raspberry Pi interfaces. Configuration can be one of two options, or both of them work together. By taking fully use of the hardware and software of both boards, the smart robot can be applied to much more application scenarios.
AlphaBot User Manual share awesome hardware Motor driver module Moter driver module is one of the most important parts of the smart robot. AlphaBot use the L298P driver chip from ST, which is a high voltage, big current motor driver chip.
AlphaBot User Manual share awesome hardware Interface definition of driver module: Interfaces Raspberry Pi Arudino IN1 P12 A0 IN2 P13 A1 ENA P6 D5 IN3 P20 A2 IN4 P21 A3 ENB P26 D6 IN1 and IN2 are connected to the left motor, while IN3 and IN4 are connected to the right motor. ENA and ENB are output enable pins, active high enable. When they are driven to High level, the PWM pulse will be outputted from IN1, IN2, IN3 and IN4, so as to control the speed of the motor robot.
AlphaBot User Manual share awesome hardware Power supply The smart robot employs two series 18650 batteries for power supply with input voltage of 7.4V. The input voltage will be deal with the LM2596 regulator, and send out to Arduino, Raspberry Pi and sensors. ! For using external power supply, the input voltage should not beyond 12V.
AlphaBot User Manual share awesome hardware 13
AlphaBot User Manual share awesome hardware Obstacle avoidance module Obstacle avoidance module consists of an infrared transceiver and a comparator. The infrared transmitter has an infrared LED array as a luminophor. When there is an obstacle (reflector) on the detection direction, the Infrared light will be reflected, and received by the infrared receiver, which is a semiconductor with a PN junction made of a special material as its core part.
AlphaBot User Manual share awesome hardware Speed testing module The speed testing module contains a coded disc and a WYC-H206 photoelectric sensor. WYC-H206 photoelectric sensor has an infrared transmitter and an infrared receiver. When the infrared receiver is obscured, unable to receive infrared light, the sensor will output a high level voltage. The high level voltage passes the inverting schmitt trigger and becomes a low level voltage. At this point, the relative indicator lights up.
AlphaBot User Manual share awesome hardware Infrared remote control The smart robot applies LFN0038K receiver to receive infrared signal. The infrared remote controller provided with the application complies with kit, the standard NEC encoding protocol. When the infrared receiver receives the infrared signal, it will output the relative pulses to the main control chip. Then, the main control part decode the signal to the key code, so as to control the corresponding motor.
AlphaBot User Manual share awesome hardware Infrared control protocol: The 32-bit binary code made up of logical “0” and logical“1” should be secondary modulated with a 38kHz robotrier frequency, in order to enhance the transmitting efficiency and reduce the power consumption. The secondary modulated code will be transmitted in the form of infrared light by a infrared transmitter, as the figure shows below.
AlphaBot User Manual share awesome hardware Ultrasonic distance measurement module The ultrasonic distance measurement module has 4 pins, they are VCC, GND, TRIG (transmitting pin) and ECHO (receive pin). Control theory: Here is the principle of ultrasonic distance measurement. When the ultrasonic wave meets a object, it will be reflected back and received by the receiver. You can get the distance of the object from the sensor by measuring the interval from transmitting signal to receiving the echo.
AlphaBot User Manual share awesome hardware The timing diagram above shows the control principle of ultrasonic distance measurement. When the module is working, it sends out a high level signal at least for 10us to control the pin TRIG to trigger distance measurement. Then, the module transmits 8 serial of 40kHz square wave automatically, to check whether there is echo signal. If there is, the module outputs a high level voltage from the pin ECHO.
AlphaBot User Manual share awesome hardware 5V operating current Vcc=5V 2.8 mA 3.3V operating current Vcc=3.3V 2.2 mA 5V minimum detection distance Vcc=5V 2 3 cm 3.3V minimum detection distance Vcc=3.3V 2 3 cm 5V maximum detection distance Vcc=5V 400 450 600 cm 3.3V maximum detection distance Vcc=3.
AlphaBot User Manual share awesome hardware Servo Servo is a auto-control system with a DC motor, a reduction gear set, a sensor and a control circuit. The servo can control the rotation angle of the output axis by transmitting control signal. It has 3 control lines, the red one is the positive power line (5V), the orange one is signal line (IO) and the brown one is power ground (GND). ☺The control signal will be sent to the signal modulating chip via the receiver, and generates the DC bias current.
AlphaBot User Manual share awesome hardware control as an example, the relationship between the pulse and the rotation angle is showed as the table below. Pulse width Rotation angle 0.5ms 0 degree 1.0ms 45 degree 1.5ms 90 degree 2.0ms 135 degree 2.
AlphaBot User Manual share awesome hardware Tracker module The working principle of the tracker module is similar to the infrared obstacle module. module avoidance The tracker has an ITR20001/T infrared reflection sensor, of which the infrared transmitter can transmit the infrared light all the time. When the infrared light is reflected back by the obstacle, it will be received by the infrared receiver. And the sensor will output the relative analog value.
AlphaBot User Manual share awesome hardware 24
AlphaBot User Manual share awesome hardware NRF24L01+wireless control AlphaBot has a SPI interface which can connect with the NRF24L01 module, a new RF transceiver. The NRF24L01 has built-in frequency synthesizer, a power amplifier, a crystal oscillator and a modulator. With enhanced ShockBurst technology integrated, its address, output power and communication channel can be configured by program, suitable for multiple machine communication.
AlphaBot User Manual share awesome hardware declares the number of bit occupied by the address in the RF data package, enabling the NRF24L01+ to make a distinction between the data and the address; Receive channel, receive the address of data, the address from channel 0 to channel 5; CRC checking, NRF24L01+ can generate CRC code and perform decoding; Working frequency, configurable between 2.4GHz to 2.
AlphaBot User Manual share awesome hardware Bluetooth control AlphaBot has a UART interface, which can connect with a Bluetooth module 2.0 directly, or connect with dual Bluetooth module via the Accessory Shield module. Since the Bluetooth module is controlled via serial port, user do not need to know much about the Bluetooth protocol. When connected with the Bluetooth module , you can control your smart robot via your mobile phone.
AlphaBot User Manual share awesome hardware interface is not provide in our application kit.
AlphaBot User Manual share awesome hardware ZigBee control AlphaBot can connect with the Core2530 (B) module via Accessory Shield, to perform ZigBee control. In this configuration, the PC should be connected to the CC2530 Eval Kit (B) via a USB cable. Here is the PC software for controlling the smart robot.
AlphaBot User Manual share awesome hardware Wifi video monitoring In AlphaBot application, when raspberry Pi works as the main control part, you can use your mobile phone or PC to perform wifi video monitoring via website control. The webiopi can help you to perform the remote control, and the mjpg-streamer software can realtime display the image captured by the camera. Webiopi, a web framework orient to Internet of Things (IoT), can control the GPIOs of raspberry Pi.
AlphaBot User Manual share awesome hardware Example programs We provide the control programs of Arduino and Raspberry Pi, enabling to implement tracking line, obstacle avoidance, remote control and video monitoring. The following example programs are available from Waveshare WIKI., Copy the library file under the directory of Arduino to the libraries folder under the installation directory of Arduino IDE.
AlphaBot User Manual share awesome hardware Click File -> Example -> AlphaBot -> E02_Infrared_Obstacle_Avoidance to open the project. Compile and download the program to the Arduino development board. Install the Infrared Proximity Sensors to the left side and the right side of the smart robot. Connect the jumper of motor in A area to the Arduino, and the jumpers DL and DR of E area to D7 and D8, respectively.
AlphaBot User Manual share awesome hardware Click File -> Example -> AlphaBot -> E04 Infrared_Remote_Control to open the project. Compile and download the program to the Arduino development board. Connect the jumper of motor in A area to the Arduino, and the jumper of the Infrared receiver IR in G area to the jumper D4 on Arduino. Expectation result: When pressed the key on the Infrared remote controller, you can control the smart robot.
AlphaBot User Manual share awesome hardware board. Install the steering gear and Ultrasonic module to the smart robot. Connect the jumpers TRIG, ECHO of Ultrasonic unit in D area to the pins D11 and D12 on the Arduino. Turn on the power adapter, the smart cat can perform ultrasonic obstacle avoidance. When there is obstacle in front of the robot, it will move to the side that far away from the obstacle.
AlphaBot User Manual share awesome hardware project. Compile and download the program to the Arduino development board. Install the Tracker Sensor to the smart robot. Connect the jumper of motor in A area to the Arduino, and the jumpers CLK, ADDR, DOUT and CS of F area to D13, D12, D11 and D10, respectively. (The servo in C area and the ultrasonic unit in D area will use these pins as well, so please remove the corresponding jumpers, avoiding interruption).
AlphaBot User Manual share awesome hardware Accessory Shield module to the smart robot via the Arduino interface, and the Bluetooth module to the Accessory Shield module via the XBeeinterface. Turn on the power adapter, and download and install the Bluetooth control software to your mobile phone. Run the software and connect with the Bluetooth, then you can control the motion of smart robot with the direction keys. OLED can display the command string that you sent.
AlphaBot User Manual share awesome hardware Raspberry Pi example program Extract the AlphaBot.tar.gz, and place it under the directory of /home/pi in the raspbian. Before using this extension board, we should install a python library to the Raspberry Pi. For more information about the Raspberry Pi library installation and configuration, please refer to the document Install necessary libraries to Raspberry Pi.
AlphaBot User Manual share awesome hardware Install the Infrared Proximity Sensors to the left side and the right side of the smart robot. Connect the jumpers IN1, IN2, ENA, ENB, IN3 and IN4 of motor in A area to the pins P12, P13, P6, P26, P20 and P21 of the Raspberry Pi, respectively. And connect the jumpers DL and DR of the infrared unit in E area to the pins P19 and P16. Enter the Linux terminal, and input the following lines: cd ~/AlphaBot/python sudo python Infrared_Obstacle_Avoidance.
AlphaBot User Manual share awesome hardware Infrared remote control program Connect the jumper of motor in A area to the Raspberry Pi, and the jumper of the Infrared receiver IR in G area to the pin P18. Enter the Linux terminal, and input the following lines: cd ~/AlphaBot/python sudo python Infrared_Remote_Control.py Expectation result: When pressed the key on the Infrared remote controller, you can control the smart robot.
AlphaBot User Manual share awesome hardware obstacle. Ultrasonic Ranging program Install the steering gear and Ultrasonic module to the smart robot. Connect the jumpers TRIG, ECHO of Ultrasonic unit in D area to the pins P17 and P5 on the Raspberry Pi. Enter the Linux terminal, and input the following lines: cd ~/AlphaBot/python sudo python Ultrasonic_Ranging.py Expectation result: The screen will show the distance measured by the Ultrasonic unit currently.
AlphaBot User Manual share awesome hardware respectively. Then, it will move to the side that far away from the obstacle. WiFi control video program This test demonstrates how to remote control the robot via webiopi, and real-time display the image captured by the camera with the software mjpg-streamer. For some browser may be unable to display the image correctly, we recommend you to use the Chrome browser or the Firefox browser. Step 1. Install webiopi cd ~/AlphaBotmjpg-AlphaBot/WebIOPi-0.7.
AlphaBot User Manual share awesome hardware Check the installation: run the command webiopi –h. When the library is installed successfully, you can see the following information as the figure shown below.
AlphaBot User Manual share awesome hardware Enter the terminal, and input the line below: sudo webiopi -d -c /etc/webiopi/config Then, open the browser on your PC or cell phone, and enter the IP address of RPi and the port number: 8000 into the address bar. For example, input http://192.168.1.16:8000 (the address can be changeable according to your actual condition). To login the website, you should enter your account and password.
AlphaBot User Manual share awesome hardware a) Run the command raspi-config to start up the camera before using it: sudo raspi-config Then, select the option Enable Camera. b) For the camera with CSI interface, the system may be unable to find out the device under the directory of /dev/video0. In this case, you should add a line, bcm2835-v4l2, into the file /etc/modules.
AlphaBot User Manual share awesome hardware g) Start up mjpg-streamer: sudo ./start.sh Then, open the browser, and enter the IP address of RPi and the port number: 8080 into the address bar. (Notices: the port number here is 8080, other than 8000 what we used before.) The website will show the information about the M-JPEG streamer. Click the option Stream, it will real-time display the image captured by the camera.
AlphaBot User Manual share awesome hardware Under the terminal, pressing the keys Ctrl + C can end the program. However, it should be kept running, since we still need it in the following operations. Step 3. Run the robot program Open another terminal; don’t end the program in the step 2.
AlphaBot User Manual share awesome hardware Enter the directory of magpi-cambot, which contains the source code for controlling the robot. cd ~/AlphaBot/mjpg-AlphaBot/mjpg-AlphaBot Modify the file index.html: sudo nano index.html You should modify the html tag according to the IP of Raspberry Pi in used.  In here, “src” is followed by the IP address of RPi: 192.168.1.
AlphaBot User Manual share awesome hardware If you cannot enter this webpage, we recommend you to use the Chrome browser or the Firefox browser. Furthermore, please make sure the current directory of Raspberry Pi is ~/AlphaBot/mjpg-AlphaBot/mjpg-AlphaBot and there should be a file index.html under this directory. And then, input the code sudo webiopi -c config to enter the index.html. Or else, you will go to the WebIOPi Main Menu webpage.
AlphaBot User Manual share awesome hardware Automatically start settings Replace the configuration file cd ~/AlphaBot/mjpg-AlphaBot/mjpg-AlphaBot sudo cp config /etc/webiopi/config This starts the webiopi script when system boot up. sudo update-rc.d webiopi defaults Edit the /etc/local file: sudo vi /etc/rc.local Append the following lines after the comment lines and you must make sure the “exit 0” line is the last statement. Then save and exit. cd /home/pi/AlphaBot/mjpg-AlphaBot/mjpg-streamer sudo .
AlphaBot User Manual share awesome hardware the smart robot. In this case, the robot speed adjustment is controlled by the analog PWM, which may occupy CPU resource. And the output of the PWM is not stable. To have a better result, we recommends using Arduino and Raspberry Pi together to control the smart robot. In this way, Arduino controls the motor and servo, and Raspberry Pi handles the video transmission and the website control. Arduino and Raspberry Pi apply serial communication. 1.
AlphaBot User Manual share awesome hardware the browser bar to control the smart robot. ! In assembling, Arduino and Raspberry Pi should not touch each other.
AlphaBot User Manual share awesome hardware Safety Precautions Product name: Smart robot extension development kit, contains AlphaBot base board, and smart robot base board. Support Arduino and Raspberry Pi development boards. Notice Please reserve the following information for future use. Caution To prevent AlphaBot, a precision device, from breaking down or being damaged, please follow the requirement listed below.
AlphaBot User Manual share awesome hardware Installing the incompatible device to the chassis may cause damage and void the warranty. The product should not expose to water and moisture, or not be placed on conductive surface, in the course of any operations.