Servo Driver HAT Servo Driver HAT User Manual OVERVIEW This Servo Driver board is an PWM/servo expansion board for Raspberry Pi. Use PCA9685 chip, expands up to 16 channels and support 12-bits resolution for each channel. Using I2C interface. This board also integrates 5V regulator, up to 3A output current, can be powered from battery through VIN terminal. It could be used to for Robot applications. FEATURES ➢ Power supply: 6V~12V (VIN terminal) ➢ Servo voltage: 5V ➢ Logic voltage: 3.
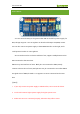
Servo Driver HAT HARDWARE You can connect battery to the green socket VIN on the left for power supply, for VIM, voltage range 6V~12V. 5V regulator on board could output 3A (MAX) current. You can also connect 5V power supply to the POWER interface on the right, and it could power micro:bit via 3.3V regulator. A0~A4 can be used to set devices address of I2C, supports multiple Servo Driver HAT connected at the same time. GPIOs on top are interfaces of servo.
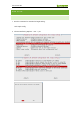
Servo Driver HAT HOW TO USE ENABLE I2C 1. Run this command on terminal to begin setting. sudo raspi-config 2.
Servo Driver HAT If errors occurs after running demo code: 1) Edit modules file: sudo nano /etc/modules 2) Add these two statements to file opened and save: i2c-dev i2c-bcm2708 RUNNING CODE We provide both python2 and python3 demo code for this HAT, to test PCA9685, WIFI remote control and Bluetooth remote control. To test WiFi and Bluetooth demo code, you should first install APP to your phone, which only support Android. Download demo code from our Wiki, then extract and copy it to Raspberry Pi.
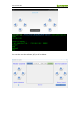
Servo Driver HAT WIFI REMOTE CONTRLLING Running the demo code: cd Servo_Driver_HAT/python/Wifi-Control sudo python main.py Expected result: Sender (Phone or PC) and receiver (Raspberry Pi) should be connected to the same LAN. This demo code uses TCP protocol for data transmitting. After running demo code, IP address of Raspberry Pi and the socket port 8000 will be printed.
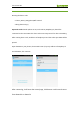
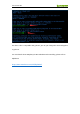
Servo Driver HAT You can also use the software (QT) on PC as below:
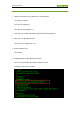
Servo Driver HAT BLUETOOTH REMOTE CONTROLLING 1. Update and install tools for Bluetooth communication sudo apt-get update sudo apt-get upgrade -y sudo apt-get dist-upgrade -y sudo apt-get install pi-bluetooth bluez bluez-firmware blueman 2. Add user pi to group bluetooth sudo usermod -G bluetooth -a pi 3. Restart Raspberry Pi sudo reboot 4. Enable/add SPP, enable Bluetooth devices sudo vi /etc/systemd/system/dbus-org.bluez.
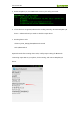
Servo Driver HAT 5. Restart Raspberry Pi, check Bluetooth services y hciconfig command: 6. If hci0 device is recognized, Bluetooth is working normally, otherwise Raspberry Pi doesn’t Bluetooth and you need to check the steps above. 7. Running demo code: cd Servo_Driver_HAT/python/Bluetooth-Control sudo ./Bluetooth.sh Expected result: After running demo code, it will prompt waiting for Bluetooth connecting. Open APP on your phone, click scanning, and connect Raspberry Pi device.
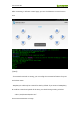
Servo Driver HAT After connecting, it will enter control page, you can clock buttons to control servos now. 【Note】 - If commands received are wrong, you can config the command of buttons for press and release states. - Raspberry Pi could only be scanned for 180s by default. If you want to letRaspberry Pi could be scanned and paired all the time, you should change setting as below: sudo vi /etc/bluetooth/main.
Servo Driver HAT The demo code is compatible with python3, you can just change the command python to python3. For more details about Raspberry Pi WIFI and Bluetooth Controlling, please refer to Alphabot2: https://www.waveshare.
Servo Driver HAT PCA9685 LIBRARIES There are some functions included in driver library PCA9685.py, you can used them when you write your own application code. INITIALIZE NEW O BJECT You can create a new object for every HAT pwm = PWM(0x40) pwm is the object we created, PWM(0x40) is creating. by default, the I2C device address of the module is 0x40. If you have changed the I2C address, you could use other address to create new object. SET PWM FREQUENCY setPWMFreq(self,freq) Used to set PWM frequency.
Servo Driver HAT SET PWM PLUSE WIDTH setPWM(self,channel,on,off) This function is used to set PWM pulse in certain channel, set its high level being (on) and finish (off) time. Parameter: - channel: PWM channel (0~15) - on: When the signal change from Low to High (0~4095) - off: When the signal changed from High to Low (0~4095) Example: The example is set channel 15 begin to output High level at 0 and finish at 1024.
Servo Driver HAT 【Note】Before this function, you should set PWM frequency to 50Hz first, otherwise servo works improperly. Parameters: - channel: PWM channel (0-`5) - pulse: pulse width outputted, unit is us (500~2500) Examples This example will output 1500us PWM signal to channel 0. That is rotate the servo 90 degree. pwm.