WAVES KRAMER MASTER TAPE USER GUIDE
TABLE OF CONTENTS CHAPTER 1 – INTRODUCTION ...................................................................................... 3 1.1 WELCOME ................................................................................................................. 3 1.2 PRODUCT OVERVIEW ................................................................................................. 3 1.3 CONCEPTS AND TERMINOLOGY .................................................................................. 4 1.4 COMPONENTS .
Chapter 1 – Introduction 1.1 Welcome Thank you for choosing Waves! In order to get the most out of your new Waves plugin, please take a moment to read this user guide. To install software and manage your licenses, you need to have a free Waves account. Sign up at www.waves.com. With a Waves account you can keep track of your products, renew your Waves Update Plan, participate in bonus programs, and keep up to date with important information.
colorations that give these rare machines their own unique sound. Special thanks go out to Bob Olhsson (Stevie Wonder, Marvin Gaye, Diana Ross) and especially John Haeny (Bonnie Raitt, Weather Report, Jackson Browne, Linda Ronstadt, Jim Morrison, Tom Jones) who provided invaluable assistance in the development of the Kramer Master Tape plugin. You can read in greater detail about the modeling process in the White Paper which is included as an appendix to this manual. 1.
which became popular with many users. Flux Flux is the term used for the level of magnetic radiation emitted from the record head on to the tape, commonly referred to as operating level. Measured in nano Webers per Meter – nWb/m, flux is essentially a gain factor reflecting a higher level passed onto the record head. While older tapes were designed to handle lower flux levels, modern tapes could withstand much higher flux before distorting, resulting in relatively lower noise.
your desired headroom, and the VU meter will offset its metering so that 0 VU will correspond to the selected headroom value. Delay While the original tape machine didn’t feature dedicated delay functions, many engineers utilized the machines for slap/feedback echo effects. The Kramer Master Tape plugin offers delay times from 1ms to 500 ms, with settings for 7.5 ips (266 ms) and 15 ips (133 ms), emulating the natural slap heard when monitoring the incoming and reproduced signals at the indicated speeds.
1.
Chapter 2 – Quick Start Guide o Insert the Kramer Master Tape on a track, group, or master. o Go to the loudest passage in your song and, using the Record Level control, adjust the input until the meter displays -5 dBVU to 0 dBVU. o If the track has important high frequency content (e.g., acoustic guitars, vocals, hi-hats, strings), use the 15 ips to better preserve high frequencies. o If the track has a lot of low frequency information (e.g., bass, kick drum, tuba), use the 7.
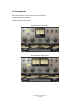
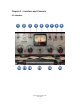
Chapter 3 – Interface and Controls 3.
3.2 Controls SPEED selects the simulated tape speed. Range: 7.5 ips, 15 ips Default: 15 ips When switching between the two speeds, the noise and frequency response will change accordingly; at 15 ips, high frequency response is increased and noise is one octave higher than at 7.5 ips. MONITOR selects the monitoring mode.
VU CALIBRATION controls the VU meter headroom calibration. It is represented by the small screw-head below the VU meter display and does not have a visible label. For most users, the default headroom setting of 18 dB should be the best choice. (On the Stereo component, use the screw located on the left to calibrate both meters.) Range: -24 dBFS – -8 dBFS Default: -18 dBFS DELAY TIME controls the time of the tape delay effect, with settings for 7.5 ips (266 milliseconds) and 15 ips (133 ms).
LOWPASS controls the LP cutoff frequency on the delay path. Range: 200 Hz – 16 kHz Default: 3.5 kHz RECORD LEVEL controls the input level. Range: +/- 18 dB Default: 0 dB LINK I/O links Record and Playback Levels controls. The link relationship is inversely proportional, i.e., an increase in Record Level results in a decrease in Playback level, and vice versa. Range: Linked/Unlinked Default: Linked PLAYBACK LEVEL controls the total signal output level.
WOW & FLUTTER controls the modulations and fluctuations of speed and gain. Range: 0 – 100 Default: 50 (as modeled from the original) NOISE controls the level of added modeled noise including noise modulations and signal additive noise. Range: Off / -40 dB to 0 (0 as modeled from the original) Default: Off 3.3 WaveSystem Toolbar Use the bar at the top of the plugin to save and load presets, compare settings, undo and redo steps, and resize the plugin.
Chapter 4 – Appendix KRAMER MASTER TAPE WHITE PAPER Written by John Haeny Based on an original outline by Mike Fradis, Waves Product Manger Edited by Michael Costa Bias Definition by Michael White Introduction When Waves started a hardware modeling project with Eddie Kramer, it was always their intention to create a model of the original recording chain from Olympic Studios in London that Eddie used on his great recordings of Led Zeppelin, The Rolling Stones and Jimi Hendrix.
for $10,000 in 1957, and was installed in his home recording studio. It became known as the "Octopus”. 8-track serial number #3 of the same machine was sold to Atlantic Records at Tom Dowd’s insistence in early 1958. Atlantic Records was the first record company to use a multi-track recorder in their studio on a regular basis. Just pause for a moment and contemplate all the great recordings that came out of that Atlantic Records recording studio.
the modeling process. Because the members of the Waves team had extensive experience with 3M Scotch 206 (a 1.5 millimeter base) and 3M Scotch 207 (a 1.0 millimeter base), 207 was selected because of the slightly thinner base, although perhaps subject to greater print-through (clearly not an issue for a tape modeled plugin), 207 provided a more intimate recording and playback head contact (called ‘tape wrap’) and thus produced a more extended high frequency response.
Bias Defined: Bias is a high frequency signal, typically between 40 kHz and 150 kHz, applied to the record head along with the audio signal when an audio track is placed into record. The bias current solves a critical problem when recording to analog tape. When the amplitude of an audio signal passes through the zero voltage crossing, the magnetic field created by the record head is not strong enough to polarize the magnetic oxide particles on the tape.
http://home.comcast.net/~mrltapes/mcknight_flux-and-flux-frequency-responsemeasurements.pdf Flux is the magnetic density recorded on the tape per meter (nWb/m), the higher the flux level - the higher the recording level on the tape. In order to reach higher recording levels you need to have tapes that can manage a higher flux level (many modern tapes can reach very high recording levels with minimum distortion with the added benefit of reduced noise or ‘tape hiss’).
plugin will be especially sensitive to settings above the recommended level of the tape sampled. When reaching higher flux levels you will notice that the low frequencies and very high frequencies become more and more distorted as the noise level goes down. Additionally there is another layer of distortion since these increased operating levels also stress the tube input and output stages, giving you the bonus of an additional level of overall “tube distortion.
many that will feel that any model is not complete without all the flaws as well. For that reason, Waves has provided you a manual wow control on the plugin’s graphic interface. It is defaulted to the wow and flutter modeled on the sample machine.
Mode Switch or Input/Reproduce In place of the classic record light you will find an illuminated yellow or amber lamp. The label above it will be in the default mode of Repro, which means the output of the Kramer Master Tape is after the model of recording on tape. (i.e., in Repro mode, you are hearing the sound of the playback head reproducing the signal previously recorded by the record head.
A description of the sound of the Kramer Master Tape is that it is best ‘felt’ as a warm, sweet and clear musical sound. Start there as your basis and then experiment with the controls to discover all the additional sonic qualities available to you, and choose those that best suit your tastes and your style of music. In Practical Application It is not possible to create a model with this level of detail and flexibility and at the same time keep its resource demands low.