WAVES JJP VOCALS User Guide
TABLE OF CONTENTS CHAPTER 1 – INTRODUCTION ..........................................................................3 1.1 WELCOME .....................................................................................................3 1.2 PRODUCT OVERVIEW ......................................................................................3 1.3 COMPONENTS ................................................................................................4 1.4 A FEW WORDS FROM JJP................................
Chapter 1 – Introduction 1.1 Welcome Thank you for choosing Waves! In order to get the most out of your new Waves plugin, please take a moment to read this user guide. To install software and manage your licenses, you need to have a free Waves account. Sign up at www.waves.com. With a Waves account you can keep track of your products, renew your Waves Update Plan, participate in bonus programs, and keep up to date with important information.
1.3 Components WaveShell technology enables us to split Waves processors into smaller plug-ins, which we call components. Having a choice of components for a particular processor gives you the flexibility to choose the configuration best suited to your material. The Waves JJP Vocals plug-in has two components: • JJP Vocals m>s – Mono in to Stereo out component • JJP Vocals Stereo – Stereo in to Stereo out component 1.
Chapter 2 – Quickstart Guide • Insert the JJP Vocals plug-in on the track you wish to process. • Choose the vocal Type according to your source: Male, Male 2, or Female. • Adjust the Sensitivity control until you achieve proper (yellow) levels, as indicated by the Sensitivity LED. • Adjust the various Main Section controls located below the Sensitivity knob to shape your sound. • Use the Center Section faders to adjust the sonic color.
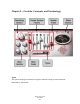
Chapter 3 – Controls, Concepts, and Terminology Types The JJP Vocals plug-in includes three Types to address a range of source materials: Male, Male 2, and Female.
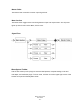
Sensitivity Section The Sensitivity LED’s 3 colors indicate when appropriate levels are reached: LED Off (too low) Green (good) Yellow (optimal) Red (very hot) Turn the Sensitivity Control until the LED lights up. For best results, use the section of your track with the highest peaks. In most cases, the Sensitivity LED indicates that your levels hit the processor in a way that will give you the intended output result.
Master Fader The Master fader controls the master output signal level. Meter Section The Meter switch toggles meter monitoring between input and output modes. The Clip LED lights up when levels reach 0 dBFS; click to reset. Signal Flow WaveSystem Toolbar Use the bar at the top of the plugin to save and load presets, compare settings, undo and redo steps, and resize the plugin. To learn more, click the icon at the upper-right corner of the window and open the WaveSystem Guide.