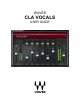
WAVES CLA VOCALS USER GUIDE
Table of Contents Chapter 1 – Introduction.................................................................................................... 3 1.1 Welcome.................................................................................................................. 3 1.2 Product Overview .................................................................................................... 3 1.3 Concepts and Terminology......................................................................................
Chapter 1 – Introduction 1.1 Welcome Thank you for choosing Waves! In order to get the most out of your new Waves plugin, please take a moment to read this user guide. To install software and manage your licenses, you need to have a free Waves account. Sign up at www.waves.com. With a Waves account you can keep track of your products, renew your Waves Update Plan, participate in bonus programs, and keep up to date with other important information.
1.3 Concepts and Terminology Sensitivity Control/Sensitivity LED The Sensitivity LED’s 3 colors indicate when appropriate levels are reached: LED Off (too low) Green (good) Yellow (optimal) Red (very hot) Push the Sensitivity Control upwards until the LED lights up. We recommend adjusting the Sensitivity Control as soon as you open the plug-in, using the section of your song with the highest peaks for best results.
1.5 Components WaveShell technology enables us to split Waves processors into smaller plug-ins, which we call components. Having a choice of components for a particular processor gives you the flexibility to choose the configuration best suited to your material.
Chapter 2 – Quickstart Guide • • • Insert the CLA Vocals plug-in on a vocal track. Adjust the Sensitivity control until you achieve proper levels, as indicated by the Sensitivity LED and the input meter. The current plug-in settings now represent Chris's default setup. Tweak the following controls to fit your mix: • • • Adjust the Bass and Treble faders. Toggle through the Colors to find the EQ that works best for the song. Use Compress for dynamic range control.
Chapter 3 – Interface and Controls 3.
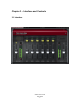
3.2 Controls Input Sensitivity is used to achieve optimal plug-in input level. Range: +/- 10 (in 0.1 steps) Default: 0 Input Meter displays input signal peak level. Range: -26 to 0 dBFS Clip LED lights up when levels exceed 0 dBFS. Click inside the meter area to reset. Balance adjusts the offset between left and right signals. (Stereo component only) Range: +/- 6 dB (in 0.1 steps) Default: 0 Sensitivity LED indicates the presence of proper levels.
Bass controls low frequency gain. Range: +/- 10 (in 0.1 steps) Default: 0 Bass Color toggles between low frequency filters. Range: Clear (Bypass), Green (Sub), Blue (Lower), Red (Upper) Default: Green (Sub) Treble controls high frequency gain. Range: +/- 10 (in 0.1 steps) Default: 0 Treble Color toggles between high frequency filters.
Compress controls the dynamic range. Range: +/- 10 (in 0.1 steps) Default: 0 Compress Color toggles between compression characters. Range: Clear (Bypass), Green (Push), Blue (Spank), Red (Wall) Default: Green (Push) Reverb controls the reverb wet mix Range: +/- 10 (in 0.
Reverb Color toggles between reverb environments. Range: Clear (Mute), Green (Tight), Blue (Large), Red (Chamber) Default: Green (Tight) Delay controls the delay wet mix. Range: +/- 10 (in 0.1 steps) Default: 0 Delay Color toggles between delay times and characters. Please note: Delay time syncs to the session BPM.
Pitch controls the pitch modulation wet mix. Range: +/- 10 (in 0.1 steps) Default: 0 Pitch Color toggles between pitch modulation types. Range: Clear (Mute), Green (Stereo), Blue (Wide), Red (Spreader) Default: Green (Stereo) Output controls the output level. Range: +/- 10 (in 0.
Output Meter displays output signal peak level. Range: -26 to 0 dBFS Clip LED lights up when levels exceed 0 dBFS. Click inside the meter area to reset. 3.3 The WaveSystem Toolbar Use the bar at the top of the plugin to save and load presets, compare settings, undo and redo steps, and resize the plugin. To learn more, click the icon at the upper-right corner of the window and open the WaveSystem Guide.