WAVES Abbey Road Reverb Plates USER GUIDE
Table of Contents Chapter 1 – Introduction ................................................................... 3 1.1 Welcome .........................................................................................................3 1.2 The Original Reverb Plates at Abbey Road Studios .......................................3 1.3 Product Overview ...........................................................................................5 1.4 Concepts and Terminology ...........................................
Chapter 1 – Introduction 1.1 Welcome Thank you for choosing Waves! In order to get the most out of your new Waves plugin, please take a moment to read this user guide. To install software and manage your licenses, you need to have a free Waves account. Sign up at www.waves.com. With a Waves account you can keep track of your products, renew your Waves Update Plan, participate in bonus programs, and keep up to date with important information.
Unlike the reverb chambers, these plates had a damper system that allowed adjustment of the reverb decay time. The damper system consisted of a fiberglass panel suspended parallel to the plate, which could move towards or away from the plate sheet. The damper could control variable distances, ranging from 1/8” away from the plate for a one-second reverberation time, to 2” away from the plate for a five-second decay.
1.3 Product Overview The Waves Abbey Road Reverb Plates plugin faithfully models the above-mentioned plates A, B, C and D. The Plate Selector control allows you to switch between the four modeled plates, letting you find the exact reverb ambience that you need. You can also choose from 11 different damper positions, giving you different reverb decay times – anywhere from 1 to 5.4 seconds, depending on the selected plate.
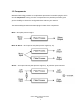
1.5 Components WaveShell technology enables us to split Waves processors into smaller plugins, which we call components. Having a choice of components for a particular processor gives you the flexibility to choose the configuration best suited to your material.
Chapter 2 – Quick Start Guide Launch the Waves Abbey Road Reverb Plates plugin on your reverb aux buss or track insert. Send a signal to the reverb aux and listen to it through the default preset. Set the Damper value that fits your overall sound image. Change the Plate Selector to find the precise plate reverb sound you want. Each plate reverb sounds different, depending on the spring, the type of amplifier engine, and the plate sheet itself.
Chapter 3 – Interface and Controls 3.
3.2 Controls Input Controls the input gain level before any processing takes place. In the Stereo component, the left and right faders can be moved independently. You can also move them together by clicking and dragging up or down in the small area between the two faders. Range: -inf to +18 dB Default: 0 dB Input Link Links the left and right Input faders (Stereo component only).
Damper Controls the reverb decay time, letting you choose from 11 different damper positions (0 to 10). Select the damper position by clicking the + and - buttons (both of which respond to extended mouse clicks), or by clicking and dragging inside the damper meter itself. Please note: The numbers on the meter represent different damper positions; they do not represent the number of seconds of decay time. Each of the four plates has its own damper behavior.
Analog Controls the amount of modeled hum & noise added to the signal. To add the precise amount of hum & noise delivered by the original plates, set the value to 100. Range: Off to 100 Default: Off Treble 4000-Hz High-shelf filter to control the reverb’s brightness. Range: -20 dB to +20 dB Default: 0 dB PreDelay Controls the amount of the delay between the dry and wet signal. Range: 0 ms–500 ms Default: 0 ms Wet/Dry Controls the balance between the dry and wet signal and thus the amount of reverb added.
Output Controls the output gain level after processing. In the Stereo component, the left and right faders can be moved independently. You can also move them together by clicking and dragging up or down in the small area between the two faders. Range: -inf to +18 dB Default: 0 dB Output Link Links the left and right Output faders (Stereo component only). When the Link control is activated, moving one fader will also move the other, and any offset between left and right output will be kept.