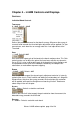
Waves – Linear-Phase MultiBand Software Audio Processor Users Guide Waves LinMB software guide page 1 of 28
Chapter 1 – Introduction Introducing Waves Linear-Phase MultiBand Processor. The LinMB is an evolved version of the C4 MultiBand Parametric Processor. If you are familiar with C4 you will find the Linear Phase MultiBand very similar, adding some true breakthrough innovation and technology that yields superior and purer results. The LinMB has • 5 discrete bands each with its own gain and dynamics for equalizing, compressing, expanding or limiting each band separately.
MultiBand devices are especially handy when dealing with the dynamics of a full range mix. In a symphonic orchestra as well as in a Rock n Roll band different instruments dominate different frequency ranges. Many times the low range dominates the whole dynamic response while the higher frequencies are riding on top. While it is the mixer’s or composer’s job to reach a desired balance, mastering engineers often find they need to do something about the dynamics of the mixed source.
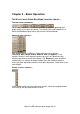
Chapter 2 – Basic Operation. THE WAVES LINEAR PHASE MULTIBAND’S CONTROL GROUPS – THE CROSSOVER FREQUENCIES The 4 Xover frequencies are set directly under the graph by grabbing their graph marker or using the text button. These define the cutoff frequencies in which the WideBand signal will be split into the 5 discrete bands. INDIVIDUAL BAND CONTROLS - Each band of Waves LINMB has 5 adjustable dynamics settings. Threshold, Gain, Range, Attack, Release, Solo and Bypass.
Other deal with the overall processor output – Gain, Trim and Dither. The Makeup control allows selection between manual mode and Auto Makeup. Finally there are 4 general compression behavior controls – Adaptive (Explained further in the next chapter), Release – Select between Waves ARC – Auto Release Control to a manually set release. Behavior – Opto or Electro modes affect the nature of the release. Knee - soft or hard knee or any value in between.
Note that this Quick Start routine is not the Golden recipe to mastering with the Linear MultiBand, it does however provide a general type practice that should let users new to MultiBand follow a recommended workflow. This example only scratches the surface of possibilities with the Linear MultiBand and there are more optional advanced features that may have implications on the workflow method. Read on in this guide to learn about some of the special advanced features.
Chapter 3 – Specialties of the Chef ADAPTIVE THRESHOLDS AND DE-MASKING. The effect of louder sounds on softer sounds has been researched for decades. There are many classifications to masking and the most effective masking is considered forward in time and upward in frequency. Simply put loud lower frequencies affect the way we perceive higher softer frequencies. The loud low frequency masks the higher frequencies.
hear how the adaptive behavior responds to them adding a more dynamic approach to dynamics. This example is somewhat extreme and it is recommended to try settings around –12 dB for subtle adaptive de-masking. It may also be interesting to lower the overall threshold of the top 4 “Adaptive” bands by Multi-selecting their thresholds and pulling them down to compensate for the added looseness, In any case when they are exposed they will be tighter and Looser when masked.
results, you may set your release time for the best compromise between Distorting and Pumping and then apply ARC to get even better results with less artifacts. Alternatively you can just count on this technology, set your release value to the desired ballpark or stick with the release scaling from a preset and rely on ARC to get it right. ARC was so well accepted wherever we introduced it and in the LinMB it is ON by default.
Chapter 4 – LinMB Controls and Displays. CONTROLS Individual Band Controls THRESHOLD. 0- -80dB. Default – 0.0dB Defines the point of reference for that band’s energy. Whenever the energy in a certain band exceeds the threshold gain adjustment will be applied. For your convenience, each band has an energy meter for visual adjustment of the Threshold GAIN. +/- 18dB. Default 0.0dB Sets the overall output gain of the band or the bands makeup value.
Defines the time it will take to release the applied gain adjustment from the moment the detected energy falls below the threshold. SOLO. Solo’s the band to the main processors output for monitoring the band-pass by itself or along with other soloed bands. BYPASS. Bypasses all processing on the band and sends it to the main output the same way it was input. This allows to monitor the processed output vs. the source for each band by itself. Crossovers – Xover There are 4 Crossovers in the liner multiband.
Sets the overall output gain. The double precision process assures no input or internal clipping so this gain is used at the output to prevent clipping. TRIM – The Auto Trim button updates the peak value and when clicked it adjusts the output gain control to trim the margin so that the peak will equal the full digital scale. For precise clip prevention let the program or at least its high gain parts pass through.
The Auto release control sets an optimal release time in relation to the manual release time. When Manual release is selected then the release of the attenuation will be absolute as indicated, Adding ARC will make the release sensitive to the amount of attenuation and set the best release time to get more transparent results. BEHAVIOR: Opto or Electro. Default – Electro.
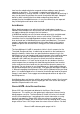
DISPLAYS THE MULTIBAND GRAPH: The MultiBand graph is like an EQ graph showing Amplitude in the Y-axis and Frequency in X-axis. In the Middle of the graph resides the DynamicLine that shows the per band gain adjustment as it happens within the Range, represented by the Bluish highlight. Beneath the graph there are the 4 Crossover frequency markers and on the graph there are 5 markers that allow you to set the gain of the band by dragging up and or down and the band’s width by dragging sideways.
Chapter 5 – Range and Threshold Concept The concept of ‘Threshold’ and ‘Range’ instead of the traditional ‘Ratio’ control creates some very flexible and powerful uses for the LINMB. They include low-level compression and expansion, giving you multiband “upward compressors” and noise reducers. OLD SCHOOL / ANOTHER SCHOOL In the classic compressor approach, if you set a very low Threshold with any given Ratio, extreme amounts of gain reduction of high level signals may occur.
HIGH-LEVEL EXPANSION (UPWARD EXPANDER) An upward expander from the C1, with a ratio of 0.75:1, Threshold at -35. Equivalent LINMB setting would be a Range of +10 or so, quite a bit more than you’d probably ever need. Shown only for clear example. To make an upward expander (an “uncompressor”) to restore overly quashed dynamics, simply reverse the Range setting. Make the Range be a positive value, say between +2 and +5.
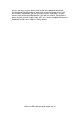
Upper line shows Low-level compression (upward), achieved when Range is negative and Gain is equal but positive. Lower line shows Low-level expansion (downward), achieved when Range is positive and Gain is equal but negative. Graph is taken from C1 to help visualize the gain structures in the LinMB. LOW-LEVEL EXPANSION (NOISE GATE) If you are interested in a noise gate for a particular band or bands, set Range to a positive Value, Gain to the inverse of the Range, and Threshold to a low value (say -60dB).
change at all, which means everything well below it gets “lifted up”. (If you take this just a bit further, you’ll figure that all audio exactly at the Threshold will have half of the Range’s value in positive gain). ONE MORE WAY TO THINK ABOUT IT Here is another bit of help so that you can really learn and use the power of the LinMB to its fullest capability. We’ll take another example from the Waves C1 Parametric Compander, our one-band processor (it also does wideband and sidechain).
example for several reasons. It is (1) a very realistic setting that could be equal to what is being done by the previously mentioned engineers; (2) only raising the noise floor by an acceptable amount for many applications; (3) easy to hear on nearly any type of audio, not only classical. In the Load menu of the LinMB are a few factory presets with names beginning “Upward Comp…” that are good points to learn more about this concept. More presets are in the LinMB Setup Library.
Chapter 6 – Examples of use PRACTICE OF MULTIBAND AND MASTERING Upon a time the mediums just couldn’t handle the same dynamic range that an orchestra can produce or a Microphone transduce, so for the lower passages not to be too low and the peaks not too high, compression and peak limiting was used. In broadcasting AM signals, the hotter the signal was the further it would reach.
TO FIX A MIX Most of the time, you want to use relatively equivalent Gain and Range settings across the bands so to not change the spectral balance too much. However, it’s not a perfect world, and many mixes are not perfect either. So let’s say you have a mix that has too much kick, the right amount of bass guitar, and needs a little “cymbal control” and de-essing. Load the BassComp/De-Esser preset. • Adjust the bass Threshold, band 1, until you have some compression.
How to create your own dynamic EQ setting (for low-level enhancement): 1. Set the Range to the amount of gain reduction desired in each band; this also sets the “EQ” of the compressed signal. 2. Set the Gain of each band so that the desired low-level EQ is seen. For instance, you may want a song to have a little more bass when it is soft, so set the bass band(s) so that their gain values are higher than the other bands. 3. Attack and release values should be appropriate for the frequency band.
or above the Threshold, the signal is increased in gain. Upward expansion takes more time to adjust because you must try to find the subjectively equal settings of what was done to the sound, and even if you know the “numbers” on the original processor, the numbers really don’t relate from one processor to the next very well. • Load the Uncompressor preset. • Notice that all Ranges are set to positive values so that the gains will be increased when the signal goes around or above the Threshold.
Chapter 7 – Factory Presets. GENERAL TIPS! Here is a recommended order for adjusting a preset, even if you have no intention of “using presets”. They are merely good places to start. Create your own library by using our User Preset command in the Save Menu. • The first step should be to adjust the nominal threshold for each band according to the energy in that band. Set the threshold arrow to the top of the metered energy, then select Auto makeup and adjust the master threshold control downward.
Deeper Not a “flat” preset, by any means, this has deeper Ranges on the high end, which means the signal will be bassier as it gets louder, and more compressed in the high end as it gets louder. Attack and release times are faster, so the compressor grabs more. Low-level Enhancer A classic loudness enhancer as described in Chapter 4 in the Low-Level Compression section.
having the classic setup of a high-level compressor. Changing the Master Release and making the release times significantly faster will still preserve transients and markedly increase the average level. Multi Electro Mastering The other end of the spectrum, insofar as the mastering goes, with much more aggressive settings throughout than the Opto setting described previously.
BassComp/De-Esser A common problem with small studio mixes is the low end, due to near-field monitors, improper room low-frequency absorption, beer, and demanding clients. Another common problem is the lack of enough de-essers to go around, and furthermore, the insistence of drummers bringing their full-size, heavy cymbals into the studio.