WAVES Eddie Kramer Effects Channel User Guide
TABLE OF CONTENTS CHAPTER 1 – INTRODUCTION ...................................................................................... 3 1.1 WELCOME .................................................................................................................3 1.2 PRODUCT OVERVIEW................................................................................................. 3 1.3 CONCEPTS AND TERMINOLOGY .................................................................................. 3 1.
Chapter 1 – Introduction 1.1 Welcome Thank you for choosing Waves! In order to get the most out of your new Waves plugin, please take a moment to read this user guide. To install software and manage your licenses, you need to have a free Waves account. Sign up at www.waves.com. With a Waves account you can keep track of your products, renew your Waves Update Plan, participate in bonus programs, and keep up to date with important information.
In most cases, the Sensitivity LED indicates that your levels hit the processor in a way that will give you the intended output result. However, it’s important to keep in mind that optimal results may be achieved even when the Sensitivity LED does not display “optimal” levels (yellow). Depending on your program material, “good” levels (green) might be best-suited to your needs; in other cases, “very hot” levels (red) might provide the most appropriate processing.
Chapter 2 – Quickstart Guide • Insert the EKramer FX plug-in on the track you wish to process. • Choose the FX type you want to hear. • Adjust the Sensitivity control until you achieve proper levels, as indicated by the Sensitivity LED. • Adjust the various controls to shape your sound. • After setting all parameters, check to make sure the Sensitivity LED indicates proper levels. If it indicates excessive levels, make the necessary adjustments.
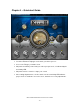
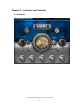
Chapter 3 – Interface and Controls 3.
3.2 Controls DIRECT IN/OUT determines whether the direct signal is fed to the output. When using the plug-in as an insert, choose Direct In; when using as a send return, choose Direct Out. Range: In, Out Default: In METER Switch toggles meter display between input and output levels. Default: Output METER displays input or output levels.
Z-SLAP TYPE selects the effect type. Range: Z-Slap, H-Slap Default: Z-Slap Please note: Changing Types will reset all controls to their initial values. SENSITIVITY controls input levels. Range: Min (0) - Max (100), in 0.1 steps Default: 50 SENSITIVITY LED indicates the presence of proper levels. Range: Green (good), Yellow (optimal), Red (very hot) DLY controls the time of the slap delay.
DLY MIX controls the mix or direct send to the slap delay. Range: Min (0) - Max (100), in 0.1 steps Default: 58 SIZE controls the size and time of the reverb effect. Range: Min (0) - Max (100), in 0.1 steps Default: 41 BRIGHTNESS controls the high frequency range of the reverb effect. Range: +/- 50 (in 0.1 steps) Default: 26.7 VERB MIX controls the amount of reverb effect that will be mixed with the input signal. Range: Min (0) - Max (100), in 0.
OUTPUT controls the output level. Range: +/- 50 (in 0.
H-SLAP TYPE selects the effect type. Range: Z-Slap, H-Slap Please note: Changing Types will reset all controls to their initial values. SENSITIVITY controls input levels. Range: Min (0) - Max (100), in 0.1 steps Default: 50 SENSITIVITY LED indicates the presence of proper levels. Range: Green (good), Yellow (optimal), Red (very hot) DLY controls the time of the slap delay.
DLY MIX controls the mix or direct send to the slap delay. Range: Min (0) - Max (100), in 0.1 steps Default: 72 SIZE controls the size and time of the reverb effect. Range: Min (0) - Max (100), in 0.1 steps Default: 41 BRIGHTNESS controls the high frequency range of the reverb effect. Range: +/- 50 (in 0.1 steps) Default: 26.7 VERB MIX controls the amount of reverb effect that will be mixed with the input signal. Range: Min (0) - Max (100), in 0.
OUTPUT controls the output level. Range: +/- 50 (in 0.1 steps) Default: 0 3.3 WaveSystem Toolbar Use the bar at the top of the plugin to save and load presets, compare settings, undo and redo steps, and resize the plugin. To learn more, click the icon at the upper-right corner of the window and open the WaveSystem Guide.