WAVES InPhase USER GUIDE
Table of Contents Chapter 1 – Introduction.................................................................................................... 3 1.1 Welcome.................................................................................................................. 3 1.2 Product Overview .................................................................................................... 3 1.3 Concepts and Terminology......................................................................................
Chapter 1 – Introduction 1.1 Welcome Thank you for choosing Waves! In order to get the most out of your new Waves plugin, please take a moment to read this user guide. To install software and manage your licenses, you need to have a free Waves account. Sign up at www.waves.com. With a Waves account you can keep track of your products, renew your Waves Update Plan, participate in bonus programs, and keep up to date with important information.
relation to a sidechain input. InPhase includes mono, stereo, and dedicated live components, plus InPhase LT, a simplified version that gives you easy access to creative phase manipulation. Phasing can cause drops in volume and wreak havoc on your frequency response and stereo image; InPhase gives you the power to get your tracks back on track. 1.3 Concepts and Terminology Phasing is a phenomenon which occurs when two or more signals are summed together.
Chapter 2 – Quick Start Guide There are three basic ways to work with InPhase: 1. Using InPhase to correct the phase relation between two mono tracks. 2. Using InPhase to correct the phase relation between the left and right channels of a stereo track. 3. Using InPhase to align a stereo track to a sidechain reference. Detailed examples for each of the above scenarios are provided in the Appendix section of this manual.
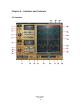
Chapter 3 – Interface and Controls 3.
3.2 Controls 1. Processing Sections InPhase has two processing sections: In Stereo components, they are called Alpha and Beta; in Mono components, Alpha and SC. 2. Process Controls In Stereo components, the Alpha and Beta Process controls let us choose what to process. When CH1 is selected in the Alpha section, it will force CH2 to the Beta section. This setup is recommended for stereo tracks or dual mono tracks such as bass amp and bass DI.
7. Type sets the phase shift filter type, and toggles between Off, Shelf (using the 1st order allpass filter) and Bell (using the 2nd order allpass filter.) 8. Frequency selects the frequency at which the phase shift is 90° using the 1st order (Shelf) allpass filter or 180° using the 2nd order (Bell) allpass filter. 9. Q sets the width of the 2nd order (Bell) allpass filter: A narrower Q results in a faster phase transition toward the selected frequency, leaving a larger portion of the frequency intact.
14. Capture has two modes, Automatic & Manual, which capture up to two seconds of signal at 44.1/48 kHz or one second at 88.2/96 kHz. o Automatic – When you click Capture, the mechanism will wait for a signal peak above -40 dBFS. When the first peak exceeds -40 dBFS, it will automatically capture the next one or two seconds (depending on the sample rate), and then stop. o Manual – Click Capture to begin capturing, and click it again to stop.
20. Reset Zoom resets the zoom to its default setting. 21. Zoom Y Beta zooms in on the Beta section y (amplitude) axis. 22. Beta Waveform is the waveform captured in the Beta section. 23. Zoom Y Link links Zoom Y Alpha and Zoom Y Beta. 24. Zoom Y Alpha zooms in on the Alpha section y (amplitude) axis. 25. Waveform Displays show the captured waveforms. The display updates in real time according to the processing applied, excluding gain changes. 26. Marker sets the center position for the zoom.
3.3 WaveSystem Toolbar Use the bar at the top of the plugin to save and load presets, compare settings, undo and redo steps, and resize the plugin. To learn more, click the icon at the upper-right corner of the window and open the WaveSystem Guide.
Appendix – Routing and Usage Examples All examples are made using Pro Tools. Example 1 – Aligning Two Mono Tracks Using Sidechain Watch the video: http://www.waves.com/content.aspx?id=11963 This example uses two tracks, bass amp and bass DI. Open the InPhase Mono component on the bass amp track Send the bass DI track to Bus 1 Assign the InPhase sidechain key input to receive from Bus 1. Click Capture and play a short loop.
Example 2 – Aligning Two Mono Tracks Routing to a Stereo Aux Watch the video: http://www.waves.com/content.aspx?id=11964 This example uses two tracks, bass amp and bass DI. Open an Aux track and assign Bus 1-2 as its input. Set the output of the bass amp to Bus 1 and the output of the bass DI to Bus 2. Open the InPhase Stereo component on the Aux. Click Capture and play a short loop.
Example 3 – Aligning a Stereo Track Watch the video: http://www.waves.com/content.aspx?id=11965 This example uses a stereo piano track. Open the InPhase Stereo component on your stereo track. In the process pull down menu of the Alpha section select CH1, which will force CH2 to the Beta section. Click capture and play a short loop. Once the capture is complete, you’ll see the left channel of the stereo piano waveform in the Alpha display and the right channel in the Beta display.
Example 4 – Aligning a Stereo Track to a Sidechain Offline Watch the video: http://www.waves.com/content.aspx?id=11966 This example uses an overheads track which we will align to the snare top track. Find a short overheads loop which contains a snare hit. From the offline menu(AudioSuite), select InPhase Stereo. Set the InPhase sidechain key input to receive from the snare top track. In the Alpha section process pull down menu, select CH1/2, which will force the SideCh to the Beta section.
The snare now has more snap and punch. Now all we need to do is process the track.