
User's Manual
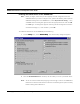
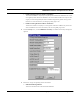

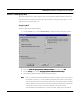
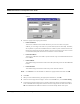
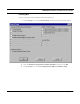

Table Of Contents
- Chapter 1 Introduction
- Features and Benefits
- Features
- Chapter 2 Quick Start
- System Description
- Package Contents
- Installation Steps
- Installation Diagram
- Polarizations on a Grid Antenna
- Chapter 3 Hardware
- Drawings of Components
- Restoring Factory Default Settings on the SPEEDLAN
- Upgrading the Firmware
- Chapter 4 Overview of Configurator
- Installation and Setup
- Toolbar and Menus
- Chapter 5 Configuring SPEEDLAN
- General Setup
- Interface & Advanced Interface Setup
- The Setup Buttons
- Chapter 6 Bridging Setup
- Bridge Setup
- Chapter 7 Setting Up the IP Addresses (IP Host Setup)
- Part I - Quick Overview of IP Addressing
- Part II - Setting Up the IP Address
- Part III - Setting Up NAT
- Chapter 8 IP-Router Setup
- IP Routing Setup
- Chapter 9 SNMP Setup
- SNMP Setup
- Chapter 10 System Access Setup
- System Access Setup
- Chapter 11 SNMP Monitoring

SPEEDLAN Installation and Operation User Guide
Setting Up the IP Addresses (IP Host Setup) 7-23
4 The Incoming Address Translation Setup dialog box appears.
5 Enter the appropriate incoming information:
• Public IP Address
This is the IP address for the outside network. If you have more than one public
address, you can assign it to a node on the private network (One-to-One NAT).
Therefore, all requests for a particular IP address from the outside or public network will
be translated to the appropriate private IP address. This may be necessary if you have
a server or workstation (or computer) that needs to be connected to a remote network.
• Private IP Address
This is the IP address for the inside network only, which hides behind the public IP
address.
• Private IP Mask
This address assigns the Subnet mask to the private network interface.
Note: Click Select to view the IP Mask List. Select the appropriate IP Mask and click OK.