
User's Manual
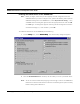
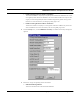

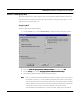
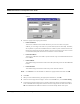
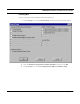

Table Of Contents
- Chapter 1 Introduction
- Features and Benefits
- Features
- Chapter 2 Quick Start
- System Description
- Package Contents
- Installation Steps
- Installation Diagram
- Polarizations on a Grid Antenna
- Chapter 3 Hardware
- Drawings of Components
- Restoring Factory Default Settings on the SPEEDLAN
- Upgrading the Firmware
- Chapter 4 Overview of Configurator
- Installation and Setup
- Toolbar and Menus
- Chapter 5 Configuring SPEEDLAN
- General Setup
- Interface & Advanced Interface Setup
- The Setup Buttons
- Chapter 6 Bridging Setup
- Bridge Setup
- Chapter 7 Setting Up the IP Addresses (IP Host Setup)
- Part I - Quick Overview of IP Addressing
- Part II - Setting Up the IP Address
- Part III - Setting Up NAT
- Chapter 8 IP-Router Setup
- IP Routing Setup
- Chapter 9 SNMP Setup
- SNMP Setup
- Chapter 10 System Access Setup
- System Access Setup
- Chapter 11 SNMP Monitoring

SPEEDLAN Installation and Operation User Guide
7-16 Setting Up the IP Addresses (IP Host Setup)
• Enable Outgoing Network Address Translation
This feature enables a company to map the private networks IP addresses into one or
more global public network IP addresses. This means that outsiders will only view the
single (or more if designated) IP network address assigned for global viewing on the
Internet. For more information, see Outgoing NAT, page 7-20.
• Enable Incoming Network Address Translation
This feature enables a company to unmap public network IP address into private net-
work IP addresses. For more information, see Incoming NAT, page 7-22.
3 From the Setup menu, choose DHCP Server Setup. The DHCP Server Setup dialog box
appears.
4 Enter the IP range and gateway/router information:
• Offered IP Starting Address
This is the start of the block of allowed IP addresses.