
User's Manual
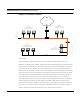
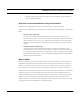
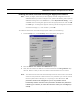
Table Of Contents
- Chapter 1 Introduction
- Features and Benefits
- Features
- Chapter 2 Quick Start
- System Description
- Package Contents
- Installation Steps
- Installation Diagram
- Polarizations on a Grid Antenna
- Chapter 3 Hardware
- Drawings of Components
- Restoring Factory Default Settings on the SPEEDLAN
- Upgrading the Firmware
- Chapter 4 Overview of Configurator
- Installation and Setup
- Toolbar and Menus
- Chapter 5 Configuring SPEEDLAN
- General Setup
- Interface & Advanced Interface Setup
- The Setup Buttons
- Chapter 6 Bridging Setup
- Bridge Setup
- Chapter 7 Setting Up the IP Addresses (IP Host Setup)
- Part I - Quick Overview of IP Addressing
- Part II - Setting Up the IP Address
- Part III - Setting Up NAT
- Chapter 8 IP-Router Setup
- IP Routing Setup
- Chapter 9 SNMP Setup
- SNMP Setup
- Chapter 10 System Access Setup
- System Access Setup
- Chapter 11 SNMP Monitoring

SPEEDLAN Installation and Operation User Guide
Setting Up the IP Addresses (IP Host Setup) 7-13
Part II - Setting Up the IP Address
The following section discusses DHCP client (and interface), DHCP Server, Static IP addresses, and
Outgoing and Incoming NAT.
Note: Before you begin, confirm that you have properly read the configuration from the
SPEEDLAN brouter you want to configure. Then, perform the following tasks: Open the
SPEEDLAN Configurator. From the File menu, choose Open Remote Config.... Then,
click Scan. The Scan dialog box appears. Select the appropriate brouter and click OK.
Click OK again. A message box appears confirming that the "Configuration has been
read from the Bridge" (i.e., 128.104.224.1). Click OK.
To set up the IP address, do ONE of the following:
• Enable DHCP client for dynamic addressing. For more information, see Enabling the DHCP
Client and Choosing the Appropriate Interface, page 7-14, OR
• Assign a static IP address. For more information, see Assigning a Static IP Address,
page 7-18.