
User's Manual
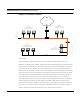
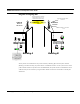
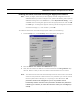
Table Of Contents
- Chapter 1 Introduction
- Features and Benefits
- Features
- Chapter 2 Quick Start
- System Description
- Package Contents
- Installation Steps
- Installation Diagram
- Polarizations on a Grid Antenna
- Chapter 3 Hardware
- Drawings of Components
- Restoring Factory Default Settings on the SPEEDLAN
- Upgrading the Firmware
- Chapter 4 Overview of Configurator
- Installation and Setup
- Toolbar and Menus
- Chapter 5 Configuring SPEEDLAN
- General Setup
- Interface & Advanced Interface Setup
- The Setup Buttons
- Chapter 6 Bridging Setup
- Bridge Setup
- Chapter 7 Setting Up the IP Addresses (IP Host Setup)
- Part I - Quick Overview of IP Addressing
- Part II - Setting Up the IP Address
- Part III - Setting Up NAT
- Chapter 8 IP-Router Setup
- IP Routing Setup
- Chapter 9 SNMP Setup
- SNMP Setup
- Chapter 10 System Access Setup
- System Access Setup
- Chapter 11 SNMP Monitoring

SPEEDLAN Installation and Operation User Guide
7-12 Setting Up the IP Addresses (IP Host Setup)
Diagram of Incoming NAT
Incoming NAT allows you to specify ports on the private network that you would like to be available
on the public network. For example, if a web server is being hosted on a public network in Building
B (IP Address 10.0.0.3), you can create a pair that will specify that all requests on the public IP
address, Port 80, be forwarded to IP Address 10.0.0.3 on the private IP address, Port 80.
Inbound Port 80 request is re-addressed
to Private address 10.0.0.3. Then, it is
forwarded across the private network
Internet
Ethernet
Router
204.101.20.1
SPEEDLAN
Brouter A
Hub
SPEEDLAN
Brouter B
Private Address on Local Interface
10.0.0.1
10.0.0.2
10.0.0.4
Ethernet
Hub
Web Server
10.0.0.3
Public Address on Remote Interface
204.101.20.3
Building A Building B