
User's Manual
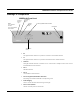
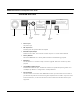

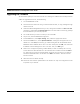
Table Of Contents
- Chapter 1 Introduction
- Features and Benefits
- Features
- Chapter 2 Quick Start
- System Description
- Package Contents
- Installation Steps
- Installation Diagram
- Polarizations on a Grid Antenna
- Chapter 3 Hardware
- Drawings of Components
- Restoring Factory Default Settings on the SPEEDLAN
- Upgrading the Firmware
- Chapter 4 Overview of Configurator
- Installation and Setup
- Toolbar and Menus
- Chapter 5 Configuring SPEEDLAN
- General Setup
- Interface & Advanced Interface Setup
- The Setup Buttons
- Chapter 6 Bridging Setup
- Bridge Setup
- Chapter 7 Setting Up the IP Addresses (IP Host Setup)
- Part I - Quick Overview of IP Addressing
- Part II - Setting Up the IP Address
- Part III - Setting Up NAT
- Chapter 8 IP-Router Setup
- IP Routing Setup
- Chapter 9 SNMP Setup
- SNMP Setup
- Chapter 10 System Access Setup
- System Access Setup
- Chapter 11 SNMP Monitoring

SPEEDLAN Installation and Operation User Guide
3-4 Hardware
Restoring Factory Default Settings on the SPEEDLAN
To restore the factory default settings on the brouter, do the following:
1 Turn off the SPEEDLAN unit.
2 Connect the PC to the brouter using a crossover Ethernet cable or using 2 Straight-through
cables and a hub.
3 Under the Network Neighborhood on your PC, change your IP address to 198.17.74.195
and assign a Subnet Mask of 255.255.255.0. You will also need to remove any gateways
that were defined in your TCP/IP properties.
4 You will be asked if you want to reboot your PC. Click Yes.
5 On the back panel of each brouter, depress the small black Factory Default switch to the
UP position. For normal operation the switch should be depressed in the down position.
Power-up the brouter and let it reboot.
6 The brouter is temporarily in factory default mode.
7 On your PC, start the SPEEDLAN Configurator.
8 From the File menu, choose Open Remote Config.
9 In the space for IP Address, enter 198.17.74.254. This is the IP Address of the brouter
while in factory default mode. Click on OK, and then OK again. You should see a message
confirming that the bridge configuration was read properly.
10 From the File menu, choose Save Remote Config.
11 All the configuration settings on the brouter have now been returned to a factory default
state. You may now configure the brouter for operation on your network.