
User's Manual
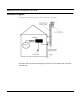
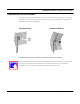
Table Of Contents
- Chapter 1 Introduction
- Features and Benefits
- Features
- Chapter 2 Quick Start
- System Description
- Package Contents
- Installation Steps
- Installation Diagram
- Polarizations on a Grid Antenna
- Chapter 3 Hardware
- Drawings of Components
- Restoring Factory Default Settings on the SPEEDLAN
- Upgrading the Firmware
- Chapter 4 Overview of Configurator
- Installation and Setup
- Toolbar and Menus
- Chapter 5 Configuring SPEEDLAN
- General Setup
- Interface & Advanced Interface Setup
- The Setup Buttons
- Chapter 6 Bridging Setup
- Bridge Setup
- Chapter 7 Setting Up the IP Addresses (IP Host Setup)
- Part I - Quick Overview of IP Addressing
- Part II - Setting Up the IP Address
- Part III - Setting Up NAT
- Chapter 8 IP-Router Setup
- IP Routing Setup
- Chapter 9 SNMP Setup
- SNMP Setup
- Chapter 10 System Access Setup
- System Access Setup
- Chapter 11 SNMP Monitoring

SPEEDLAN Installation and Operation User Guide
2-4 Quick Start
b) Allow for as much space between the wall brackets as possible while still maintaining the
antenna height necessary. For extended poles, additional wall brackets may be necessary.
c) Assemble the antenna and mount it to the pole using the included U-bolt hardware. On
larger dish-type antennas, align the grid on the dish to run parallel with the grid on the tip
of the antenna horn. Preferably, the grid should be horizontal (or parallel) to the ground.
Make sure all bolts and screws are fastened tightly.
d) Fasten the pole to the brackets. Position the antenna, point it in the appropriate direction,
and tighten the screws.
Step 3. Run the Cabling
The installation kit comes with two lengths of cable with ready made connectors that fit your
particular installation.
a) Attach the shorter cable to the antenna, making sure the connectors are screwed on tightly.
b) Attach the lightning arrestor to the end of the shorter cable.
c) Attach the longer cable to the lightning arrestor.
d) Drill the hole needed to get through the wall, being very careful not to drill into power con-
duits or other utilities in the wall.
e) Feed the cable through the wall and run it to the SPEEDLAN base station brouter.
f) Fasten all cabling securely to the pole and walls using clamps and zip ties. Do not run cable
over electrical devices such as fluorescent lights because these devices will interfere with the
operation of the brouter. Be careful when pulling or fastening the cable that unnecessary
pressure does not break your connectors.
g) Seal all outdoor connections with the black electrical tape and black sealant insulation putty
that comes in the installation kit. First, wrap the connectors tightly with the tape. Then, care-
fully wrap the connectors evenly with the insulation putty, making certain to leave no cracks
that would allow water to penetrate the seal.