
User's Manual

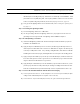

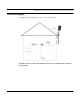
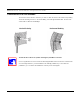
Table Of Contents
- Chapter 1 Introduction
- Features and Benefits
- Transparent Ethernet Bridging with Advanced Filtering for Security and Network Reliability
- IP Routing with Advanced Filtering for Security
- SNMP Management
- SNMP Features
- SNMP Management
- IP-Router Features
- Encryption Features (Add-on Option)
- Wireless Multipoint Protocol
- Additional Functionality for SPEEDLAN 4100 & 4200
- Features
- Chapter 2 Quick Start
- System Description
- Package Contents
- Installation Steps
- Installation Diagram
- Polarizations on a Grid Antenna
- Chapter 3 Hardware
- Upgrading the Firmware
- Chapter 4 Overview of Configurator
- Installation and Setup
- Toolbar and Menus
- Chapter 5 Configuring SPEEDLAN 4100 & 4200
- General Setup
- Interface & Advanced Interface Setup
- The Setup Buttons
- Chapter 6 Bridging Setup
- Bridge Setup
- Chapter 7 Setting Up the IP Addresses (IP Host Setup)
- Part I - Quick Overview of IP Addressing
- Part II - Setting Up the IP Address
- Chapter 8 IP-Router Setup
- IP Routing Setup
- Chapter 9 SNMP Setup
- SNMP Setup
- Chapter 10 System Access Setup
- System Access Setup
- Chapter 11 SNMP Monitoring
- Remote Statistics
- Interface Monitor
- Ethernet-like Interface Monitor
- Campus PRC Station Entries
- 11Mb RF Interface
- SNMP Monitor
- IP Monitor
- IP/TCP/UDP Monitor
- ICMP Monitor
- Chapter 12 Tables
- System Information
- Bridge Learn Table
- IP ARP Table
- IP Route Table
- IP/TCP Connection Table
- IP/UDP Listener Table
- Local IP-Address Table
- Chapter 13 Analyzing Wireless Equipment
- Select Another Device
- Analysis Polling Interval
- Wireless Link Test
- Antenna Alignment
- Glossary for Standard Data Communications
- Glossary for Standard Data Communications
- Appendix Protocols & Ethernet Addresses
- Common Ethernet Protocols
- Common Ethernet Vendor Addresses
- Common Ethernet Multicast Addresses
- Common Ethernet Broadcast Addresses

SPEEDLAN 4100 & 4200 Installation and Operation User Guide
2-6 Quick Start
f) Create a proper weatherproofing seal on all outdoor connections by wrapping it with
electrical tape and sealing it with putty. This is the most crucial step of the installation. If this
procedure is not completed, long-term and complex problems could occur. For more infor-
mation on implementing this procedure, see Weatherproofing Connectors, page 2-6.
g) Next, ground the lighting arrestor. For more information, see Grounding the Lightning Arres-
tor, page 2-6.
Step 5. Grounding the Lightning Arrestor
a) Mount the lightning arrestor to a solid surface.
b) Run the grounding wire from the lightning arrestor to a proper ground source such as a
grounding rod or roof ground wire. The lightning arrestor is NOT waterproof.
Step 6. Weatherproofing Connectors
a) Seal the entire lightning arrestor with the black waterproof sealant insulation putty that is
included in the installation kit.
b) Apply two layers of electrical tape to the connector, and leave approximately 3 inches of
cable exposed on either side of the connector. An alternative is to begin at the lowest point,
so the tape overlaps from bottom to top creating a shingled effect. (This creates an effective
barrier against water runoff). Apply this "shingle effect" to each layer of the sealing process.
c) Apply one layer of insulation putty over the top of the electrical tape, and leave at least one
inch of the cable jacket to ensure a good seal. Do not stretch the putty, as this causes thin-
ning and reduces the effectiveness of a good seal.
d) Apply five layers of electrical tape over the insulation putty and extend at least one (1) inch
past the putty. This is the most important step in creating a watertight seal. Make sure that
there are no wrinkles in the tape and the final wrap must be completed from bottom to top.
Step 7. Connect the Wireless SPEEDLAN Brouter to the Power Supply
a) Connect power cord of AC-DC 18 Vdc adapter to 110 or 220 Vac power outlet (the input
voltage of this universal adapter can vary from 100 to 240 Vac).
b) Connect the DC output of the adapter (18 Vdc) to DC jack on the indoor junction box.