
User's Manual


SPEEDLAN TM
46
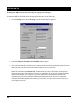
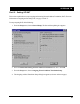
4. Enter the IP range and gateway/router
information:
• Offered IP Starting Address – This
is the start of the block of allowed IP
addresses. For example, the
“offered” IP address between a block
of 20 to 40 is 20.
• Offered IP Ending Address – This is
the end of the block of allowed IP
addresses. For example, the “ending”
IP address between a block of 20 and
40 is 40.
• Default Router Address – This is the
IP address of the default router that
allows clients to move outgoing packets
to a single router on the same subnet.
• Default Router Mask – This is the
router that initially accepts or transfers
packet to the directly connected
networks or static networks.
• Lease Time in Minutes – This is the
amount of minutes that the computer
can use the assigned IP address. When
the time is up, the IP address will be
reassigned to another computer.
Note: Click Select to view the IP Mask List. Select the appropriate IP Mask and click OK.
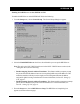
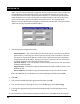
5. Enter the domain name information:
• 1
st
DNS Server IP – This setting will specify the client’s 1st DNS Server.
• 2nd DNS Server IP – This setting will specify the client’s secondary DNS server.
• 3
rd
DNS Server IP – If needed, this setting will specify the client’s third DNS server.
• Domain Name – This is the web domain name of the organization on the Internet such as
“www.speedlan.com”. It is not necessary to use the first portion of the domain name leaving
the entry as “Speedlan.com”.
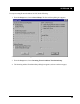
6. Select the interface that you want to Enable DHCP on (i.e., Ethernet or wireless interface).
7. Click OK.
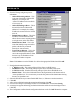
8. After you have finished entering the appropriate information, click OK.
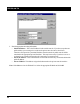
9. Now save the changes to the bridge or router. From the File menu, choose Save Config.
10. A message box appears informing you that the information will be saved to the bridge or router.
Click Ye s .
11. The Configurator confirms that the configuration has been saved. Click OK. Restart the computer.