
User Manual

SPEEDLAN 9000 Series Installation and Operation User Guide Version 3.03
General Functions of the Configurator 3-17
After Logging On
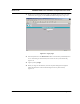
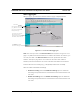
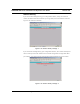
After you log on, you will see the Network Interfaces page, as displayed below.
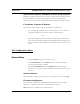
Figure 3-14: 1st screen after logging on
Note: The name you enter in the Network Name text box (shown in Figure 3-14 on
page 3-17) determines what the interfaces are called on the network. For instance, you
can enter, "Star Net" in the Network Name text box to represent the "Star CPE"
interface. This option just gives the user control over the name of the interface.
Therefore, Star Net would be the new name of the Star CPE interface and would be
located under the menu headings (e.g., TCP/IP, RIP2, DHCP Server and NAT).
What are enable and disable forwarding?
• Enable Forwarding: Select the Enable Forwarding option to enable the
forwarding of IP packets from the wired interface to the wireless interface and
vice-versa.
• Disable Forwarding: Select the Disable Forwarding option to disable the
forwarding of IP packets from the wired interface to the wireless interface and
vice-versa.
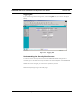
Main Menu
Click Refresh to refresh
data on the web page.
Enter the name that you
want to name the network.
Then, click Apply to make
changes.
This is where you select the
type of router: pt to pt
primary, pt to pt secondary,
base station, CPE, mesh, etc.
If you click the interface link
(e.g., Ethernet in this case),
you will jump to the TCP/IP
Configuration page.