
User's Manual
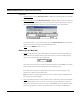
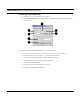
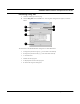
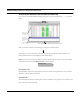

Table Of Contents
- Chapter 1 Introduction
- Features and Benefits
- Equipment Features
- SPEEDLAN K2's Polling Protocol -- How it Works in Star Networks
- SPEEDLAN 9000 Mesh Protocol -- How It Works in Non-Line-of-Sight Networks
- Chapter 2 Installing the SPEEDLAN 9101 & SPEEDLAN 9102 Hardware
- Rooftop and Tower Installations Warning
- Hardware Overview
- Drawings of Outdoor, Remote-Mounted Components
- The SPEEDLAN 9101 (with an Attached Standard Omni)
- The SPEEDLAN 9102 (with an External Antenna)
- Chapter 3 Using the SPEEDLAN 9000 Configurator
- Initial Configuration of the SPEEDLAN 9000
- Overview of the SPEEDLAN 9000 Configurator Main Menu
- Logging on to the SPEEDLAN 9000 Configurator
- Interfaces
- System
- Routing
- Wireless
- DHCP Server
- DHCP Relay
- NAT
- Diagnostics & Troubleshooting
- Administrative Access Pages
- Chapter 4 Using SPEEDView
- What is SPEEDView?
- System Requirements
- Installation Instructions
- Starting SPEEDView
- The Program Instructions
- The Main Tab
- Options Tab
- Admin Tab
- Chapter 5 Basics of IP Addressing
- Basics of IP Addressing
- Glossary for Standard Data Communications
- Glossary for Standard Data Communications
- Software License Agreement

SPEEDLAN 9000 Installation and Operation User Guide
Using SPEEDView 4-11
View menu
•
Message Toolbar: Choose Message Toolbar to display the test message box just under the
Node menu.
• Bandwidth Toolbar: Choose Bandwidth Toolbar to display a short-cut version of the band-
width test (displays results of traffic moving in both directions of the selected link). Next, you
will see the bandwidth toolbar appear on the top of the Main tab, as circled below.
Choose the duration: 15, 30 or 60 seconds. Then, click Bandwidth Test. The results will be
displayed in the box to the right of the Bandwidth Test button.
• Zoom: Choose Zoom to zoom in or out.
Buttons (on the Main tab)
• Send: Click this button to send a UDP-based test message to any node on the 9000 net-
work. Select the test message from the drop-down list such as: Hello, Goodbye, Testing,
Marco or Polo (located just under the Main tab).
Then, select the node where you want to send the test message and click Send. The remote
node automatically echoes the message back to the originating node.
If successful, you will see your message flash (in blue) on your network diagram. This
indicates a successful round trip of the data.
Note: If someone is monitoring the remote node with another instance of SPEEDView, he
will also see your message appear.
• Trace: (This button appears for mesh networks only.) Click this button to trace the data flow
between the node pair or link. To set up a trace route, select the destination node. (The
node you are connected to is the source.) Then, choose Trace. You will see the links chosen
by the routing algorithm in order to send data from the source node to the destination
results here