
User's Manual
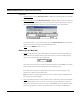
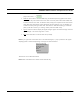
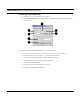
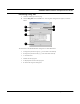
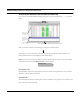
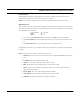

Table Of Contents
- Chapter 1 Introduction
- Features and Benefits
- Equipment Features
- SPEEDLAN K2's Polling Protocol -- How it Works in Star Networks
- SPEEDLAN 9000 Mesh Protocol -- How It Works in Non-Line-of-Sight Networks
- Chapter 2 Installing the SPEEDLAN 9101 & SPEEDLAN 9102 Hardware
- Rooftop and Tower Installations Warning
- Hardware Overview
- Drawings of Outdoor, Remote-Mounted Components
- The SPEEDLAN 9101 (with an Attached Standard Omni)
- The SPEEDLAN 9102 (with an External Antenna)
- Chapter 3 Using the SPEEDLAN 9000 Configurator
- Initial Configuration of the SPEEDLAN 9000
- Overview of the SPEEDLAN 9000 Configurator Main Menu
- Logging on to the SPEEDLAN 9000 Configurator
- Interfaces
- System
- Routing
- Wireless
- DHCP Server
- DHCP Relay
- NAT
- Diagnostics & Troubleshooting
- Administrative Access Pages
- Chapter 4 Using SPEEDView
- What is SPEEDView?
- System Requirements
- Installation Instructions
- Starting SPEEDView
- The Program Instructions
- The Main Tab
- Options Tab
- Admin Tab
- Chapter 5 Basics of IP Addressing
- Basics of IP Addressing
- Glossary for Standard Data Communications
- Glossary for Standard Data Communications
- Software License Agreement

SPEEDLAN 9000 Installation and Operation User Guide
4-10 Using SPEEDView
The Node, Link, Stats and View Menus (on the Main tab)
There are several commands located under the Node, Link, Stats and View menus on the main tab.
Node menu
•
Configure: Choose Configure to launch the SPEEDLAN 9000 Configurator, which is a web
browser used to view/configure many parameters and services for that node. This is the
same as double-clicking any node. See the SPEEDLAN 9000 Series Installation and Opera-
tion Manual for further instructions.
• Hide:
If there are too many nodes to comprehensively view on the 9000 network, select the
nodes you want to hide and choose Hide.
• Show: Choose Show to display any nodes that were previously hidden using the “Hide”
feature.
• Select All: If you want to select all of the nodes on the 9000 network (including hidden),
choose Select All. This is useful for hiding a large number of nodes.
Link menu
•
Bandwidth Test: Choose Bandwidth Test and a node pair or link to verify that your equip-
ment is communicating properly at the RF level. This process will help you during your per-
formance evaluation. See Performing a Bandwidth Test, page 4-13 for further instructions.
• Ping Test: Choose Ping Test to verify node connectivity. See Performing a Ping Test,
page 4-14 for further instructions.
• Block: (This command is used with mesh networks only.) Select the node pair or link. (Press
the Ctrl key on your keyboard to select more than one node or link at a time.) Next, choose
Block. When you “block” a connection, the node pair will not be able to communicate.
• Unblock: (This command is used with mesh networks only.) Select the nodes or links you
want to unblock. Next, choose Unblock to clear the “blocked” path.
Stats menu
•
Show All Link Stats: Choose Show All Link Stats to display all the statistics of all of the links
in the statistics window (bottom half of Main tab).
• Clear Stats: Choose Clear Stats to remove the statistics of the links in the statistics window
(bottom half of Main tab).