
User's Manual

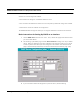
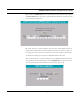

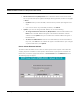

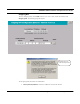
Table Of Contents
- Chapter 1 Introduction
- Features and Benefits
- Equipment Features
- SPEEDLAN K2's Polling Protocol -- How it Works in Star Networks
- SPEEDLAN 9000 Mesh Protocol -- How It Works in Non-Line-of-Sight Networks
- Chapter 2 Installing the SPEEDLAN 9101 & SPEEDLAN 9102 Hardware
- Rooftop and Tower Installations Warning
- Hardware Overview
- Drawings of Outdoor, Remote-Mounted Components
- The SPEEDLAN 9101 (with an Attached Standard Omni)
- The SPEEDLAN 9102 (with an External Antenna)
- Chapter 3 Using the SPEEDLAN 9000 Configurator
- Initial Configuration of the SPEEDLAN 9000
- Overview of the SPEEDLAN 9000 Configurator Main Menu
- Logging on to the SPEEDLAN 9000 Configurator
- Interfaces
- System
- Routing
- Wireless
- DHCP Server
- DHCP Relay
- NAT
- Diagnostics & Troubleshooting
- Administrative Access Pages
- Chapter 4 Using SPEEDView
- What is SPEEDView?
- System Requirements
- Installation Instructions
- Starting SPEEDView
- The Program Instructions
- The Main Tab
- Options Tab
- Admin Tab
- Chapter 5 Basics of IP Addressing
- Basics of IP Addressing
- Glossary for Standard Data Communications
- Glossary for Standard Data Communications
- Software License Agreement

SPEEDLAN 9000 Installation and Operation User Guide
Using the SPEEDLAN 9000 Configurator 3-29
Domain Name Servers
• Domain Name Servers (DNS) list box: This is where the domain name servers reside.
You can prioritize them (from highest to lowest) by selecting the DNS, and then clicking Up
or Down.
• Up/Down: After you select the DNS, use this button to prioritize (from highest to low-
est) it.
• If you want to remove any of the DNS parameters, click Delete.
• Update: If you want to change the DNS address, do one of the following:
• To change the Domain Name Server (DNS) address: Select the DNS address in the
DNS list box. The DNS address will appear to the left of the Add button. Edit the
address and click Update when you’re finished. The modified address will appear in
the DNS list box.
• To add a new DNS address: Enter the new DNS address (to the left of the Add but-
ton). Then, click Add. The new address will appear in the DNS list box. If you changed
any of the DNS servers, click Update.
Known Clients Elements Defined
The feature allows the DHCP server to allow or decline specific client requests. It also allows the
mapping of specific IP address to certain specific network hosts. To specify known clients for the
DHCP server, choose the appropriate interface + Known Clients from the DHCP Server menu.
The following page will appear.