
User's Manual
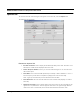

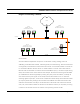
Table Of Contents
- Chapter 1 Introduction
- Features and Benefits
- Equipment Features
- SPEEDLAN K2's Polling Protocol -- How it Works in Star Networks
- SPEEDLAN 9000 Mesh Protocol -- How It Works in Non-Line-of-Sight Networks
- Chapter 2 Installing the SPEEDLAN 9101 & SPEEDLAN 9102 Hardware
- Rooftop and Tower Installations Warning
- Hardware Overview
- Drawings of Outdoor, Remote-Mounted Components
- The SPEEDLAN 9101 (with an Attached Standard Omni)
- The SPEEDLAN 9102 (with an External Antenna)
- Chapter 3 Using the SPEEDLAN 9000 Configurator
- Initial Configuration of the SPEEDLAN 9000
- Overview of the SPEEDLAN 9000 Configurator Main Menu
- Logging on to the SPEEDLAN 9000 Configurator
- Interfaces
- System
- Routing
- Wireless
- DHCP Server
- DHCP Relay
- NAT
- Diagnostics & Troubleshooting
- Administrative Access Pages
- Chapter 4 Using SPEEDView
- What is SPEEDView?
- System Requirements
- Installation Instructions
- Starting SPEEDView
- The Program Instructions
- The Main Tab
- Options Tab
- Admin Tab
- Chapter 5 Basics of IP Addressing
- Basics of IP Addressing
- Glossary for Standard Data Communications
- Glossary for Standard Data Communications
- Software License Agreement

SPEEDLAN 9000 Installation and Operation User Guide
4-20 Using SPEEDView
• Signal Link Indicators: Selecting this item will produce graphical link indications to show
which link a Signal label is attached to. This is useful for a large number of nodes. In order
to display the signal, you must have clicked Signal (on the Main tab).
• Show Noise: Click to show the noise for the wireless node (displays to the right of the Sig-
nal on the Main tab). In order to display the noise, you must have clicked Signal (on the
Main tab).
• Show IP Address: Click to show the IP address for the wireless node (displays on node on
Main tab).
• Anim Timer (Animation Timer): Select this drop-down list to change the animation speed
during a trace route test. The speed is measured in milliseconds.
• Signal Font: To change the font size of the signal, click this drop-down list and select one
of the following: default, tiny, small, medium or large.
• IP Label Octets: To change how many octets appear for the label (IP address or IP label)
on the Main tab, click this drop-down list. You can select up to 4 octets. (Note that selecting
“4” will display the full IP address.)
• Node Label Font: This is the font used to display the IP Label. To change the size, click this
drop-down list and select one of the following: default, tiny, small, medium or large.
• Node Icon: This displays how the SPEEDLAN 9000 node will appear on the Main tab. You
can select one of the following: Smiley Face, Node, SPEEDView icon (small and large) or
a Computer icon.
• Trace Icon:
This displays which Trace Route icon (star or black dot) will appear on the net-
work diagram (on the Main tab). The default is shown below).
• “+” button: Select this button to move forward.
• “-“button: Select this button to move backward.
• Configurator Options:
• The drop-down list to the left lets you connect directly to SPEEDView or via proxy. Using
Connect with Proxy is the default because you will likely not have a TCP route to all
nodes in the SPEEDView network diagram. In this mode the connection is proxied
through the 9000 node where it is connected. Selecting Connect Directly is faster, but
it assumes you do have a direct route to the 9000 node you are trying to configure
(and it must have a route back to your computer).
• The drop-down list to the right allows 4 available ports to configure each 9000 node.
The first two are the standard HTTP port (80) and the standard HTTPS port (443). Over
an insecure network using HTTPS is preferred to protect configuration passwords.
There are two alternate ports for configuration (6589 and 6590). That is, in case you