
User's Manual
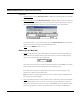
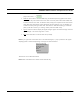
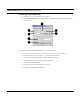
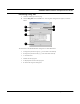
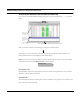
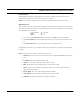
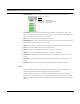

Table Of Contents
- Chapter 1 Introduction
- Features and Benefits
- Equipment Features
- SPEEDLAN K2's Polling Protocol -- How it Works in Star Networks
- SPEEDLAN 9000 Mesh Protocol -- How It Works in Non-Line-of-Sight Networks
- Chapter 2 Installing the SPEEDLAN 9101 & SPEEDLAN 9102 Hardware
- Rooftop and Tower Installations Warning
- Hardware Overview
- Drawings of Outdoor, Remote-Mounted Components
- The SPEEDLAN 9101 (with an Attached Standard Omni)
- The SPEEDLAN 9102 (with an External Antenna)
- Chapter 3 Using the SPEEDLAN 9000 Configurator
- Initial Configuration of the SPEEDLAN 9000
- Overview of the SPEEDLAN 9000 Configurator Main Menu
- Logging on to the SPEEDLAN 9000 Configurator
- Interfaces
- System
- Routing
- Wireless
- DHCP Server
- DHCP Relay
- NAT
- Diagnostics & Troubleshooting
- Administrative Access Pages
- Chapter 4 Using SPEEDView
- What is SPEEDView?
- System Requirements
- Installation Instructions
- Starting SPEEDView
- The Program Instructions
- The Main Tab
- Options Tab
- Admin Tab
- Chapter 5 Basics of IP Addressing
- Basics of IP Addressing
- Glossary for Standard Data Communications
- Glossary for Standard Data Communications
- Software License Agreement

SPEEDLAN 9000 Installation and Operation User Guide
4-18 Using SPEEDView
TCP Dump Tab
This tab allows you to look at packet headers on a given network interface as they occur. This is
useful for determining what traffic a node is receiving when debugging a network connection. This
tab is used with star and mesh networks.
• Start: Click the node that you want to "tcp dump" and click this button.
• Stop: Stops the tcp dump.
• Clear: Click to clear all information in the output window.
• Show Routes: Click to query the current routing table for the selected node.
• Save to File: Click to save all text in the output window for diagnostic purposes.
TCP Setup
This tab allows you to set up TCP Dump. This tab is used with star and mesh networks.
• Use: Select this box to activate the item you want to include.
• Item: The item to filter.
• Src: The filter item only applies to the source of the packet.
• Dest: The filter items only applies to the destination of the packet.
• IP Address: Use this to include (exclude) the display of packets destined for or coming from
(or both) to a given network host.
• Port: Use this to include (exclude) the display of packets destined for or coming from (or
both) a given network port. Select port by protocol: HTTP (80), POP3 (110), SMTP (25),
TELNET (23), FTP (21), FTP_Data (20), SSH (22) or Custom (the port you enter).
• Protocol: Select either arp (Address Resolution Protocol), ip (Internet Protocol), tcp (Trans-
mission Control Protocol), and udp (User Datagram Protocol)
• Interface: The wired (i.e., eth1) or wireless (i.e., wlan1) interface where the device is con-
nected.
• Include Selected From Above: Click to enter the selected criteria into the “Include” filter
list.
• Exclude Selected From Above: Click to exclude the selected criteria into the "Exclude"
filter list.
• Remove Selected: Highlight the filter criteria you want to remove and click this button.
• Clear: Click to remove all filter criteria items from this box.
Select the boxes next to the filter item that you would like to define, as shown below.
Unselected Selected
box box