
User's Manual

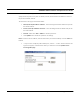

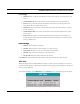
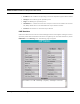
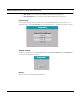
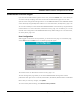
Table Of Contents
- Chapter 1 Introduction
- Features and Benefits
- Equipment Features
- SPEEDLAN K2's Polling Protocol -- How it Works in Star Networks
- SPEEDLAN 9000 Mesh Protocol -- How It Works in Non-Line-of-Sight Networks
- Chapter 2 Installing the SPEEDLAN 9101 & SPEEDLAN 9102 Hardware
- Rooftop and Tower Installations Warning
- Hardware Overview
- Drawings of Outdoor, Remote-Mounted Components
- The SPEEDLAN 9101 (with an Attached Standard Omni)
- The SPEEDLAN 9102 (with an External Antenna)
- Chapter 3 Using the SPEEDLAN 9000 Configurator
- Initial Configuration of the SPEEDLAN 9000
- Overview of the SPEEDLAN 9000 Configurator Main Menu
- Logging on to the SPEEDLAN 9000 Configurator
- Interfaces
- System
- Routing
- Wireless
- DHCP Server
- DHCP Relay
- NAT
- Diagnostics & Troubleshooting
- Administrative Access Pages
- Chapter 4 Using SPEEDView
- What is SPEEDView?
- System Requirements
- Installation Instructions
- Starting SPEEDView
- The Program Instructions
- The Main Tab
- Options Tab
- Admin Tab
- Chapter 5 Basics of IP Addressing
- Basics of IP Addressing
- Glossary for Standard Data Communications
- Glossary for Standard Data Communications
- Software License Agreement

SPEEDLAN 9000 Installation and Operation User Guide
Using the SPEEDLAN 9000 Configurator 3-33
• Private (Internal) Address: Enter the IP address for the inside or private network. This
address hides behind the Public IP address.
• Private (Internal) Netmask: Select the netmask assigned to the private network interface.
To add a second Private (Internal) address, enter the address and select the correct mask.
Then, click Add.
Incoming NAT
To s e t up I nco min g N AT, c h o o s e NAT from the main menu. Next, choose the interface and
Incoming. The following page will appear.
Incoming NAT allows you to specify ports on the private network (Building B) that you would like to
be available on the public network (Building A and the Internet). For example, if a web server (IP
Displays when
you press the
Help button