
User's Manual

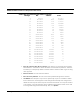
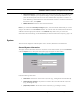
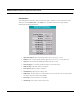
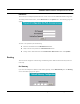
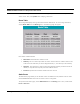
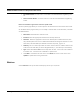
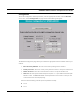
Table Of Contents
- Chapter 1 Introduction
- Features and Benefits
- Equipment Features
- SPEEDLAN K2's Polling Protocol -- How it Works in Star Networks
- SPEEDLAN 9000 Mesh Protocol -- How It Works in Non-Line-of-Sight Networks
- Chapter 2 Installing the SPEEDLAN 9101 & SPEEDLAN 9102 Hardware
- Rooftop and Tower Installations Warning
- Hardware Overview
- Drawings of Outdoor, Remote-Mounted Components
- The SPEEDLAN 9101 (with an Attached Standard Omni)
- The SPEEDLAN 9102 (with an External Antenna)
- Chapter 3 Using the SPEEDLAN 9000 Configurator
- Initial Configuration of the SPEEDLAN 9000
- Overview of the SPEEDLAN 9000 Configurator Main Menu
- Logging on to the SPEEDLAN 9000 Configurator
- Interfaces
- System
- Routing
- Wireless
- DHCP Server
- DHCP Relay
- NAT
- Diagnostics & Troubleshooting
- Administrative Access Pages
- Chapter 4 Using SPEEDView
- What is SPEEDView?
- System Requirements
- Installation Instructions
- Starting SPEEDView
- The Program Instructions
- The Main Tab
- Options Tab
- Admin Tab
- Chapter 5 Basics of IP Addressing
- Basics of IP Addressing
- Glossary for Standard Data Communications
- Glossary for Standard Data Communications
- Software License Agreement

SPEEDLAN 9000 Installation and Operation User Guide
3-16 Using the SPEEDLAN 9000 Configurator
• Manually Configure: Select this option if you want to statically assign an IP address to the
interface. For example: you may want to assign a "static" (permanent) address to a com-
puter that will always be used as a server. This enables other computers to connect to it.
Static addressing is also beneficial to users that need to maintain a "constant" connection to
the Internet. Then, click Update.
• DHCP Hostname: Enter the name of the DHCP Host.
Note: If you selected the Manually Configure option, enter the Internet address that you want to
assign to the interface in the IP Address text box. You will also enter the subnet/netmask for the IP
address. Select the appropriate netmask in the Netmask drop-down list. If you need more
information about netmasking, see the CIDR Table (For Netmask Information Purposes), page 3-15.
System
There are three categories under the System menu: General, Performance and Password.
General/System Information
This page contains information about the unit/router on the network. When you choose General
under the System menu, the System Information page will appear as shown below.
Enter the following information:
• Host Name: The domain name of the unit/router (e.g., fatdog.devnet.wavewireless.net).
• (Optional) Host Contact: The person to contact if there is trouble with the unit/router
(e.g., johndoe@aol.com).
• (Optional) Location: The location of the unit/router (e.g., building or closet).