
User's Manual
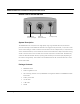
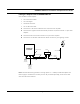
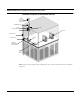
Table Of Contents
- Chapter 1 Introduction
- Features and Benefits
- Equipment Features
- SPEEDLAN K2's Polling Protocol -- How it Works in Star Networks
- SPEEDLAN 9000 Mesh Protocol -- How It Works in Non-Line-of-Sight Networks
- Chapter 2 Installing the SPEEDLAN 9101 & SPEEDLAN 9102 Hardware
- Rooftop and Tower Installations Warning
- Hardware Overview
- Drawings of Outdoor, Remote-Mounted Components
- The SPEEDLAN 9101 (with an Attached Standard Omni)
- The SPEEDLAN 9102 (with an External Antenna)
- Chapter 3 Using the SPEEDLAN 9000 Configurator
- Initial Configuration of the SPEEDLAN 9000
- Overview of the SPEEDLAN 9000 Configurator Main Menu
- Logging on to the SPEEDLAN 9000 Configurator
- Interfaces
- System
- Routing
- Wireless
- DHCP Server
- DHCP Relay
- NAT
- Diagnostics & Troubleshooting
- Administrative Access Pages
- Chapter 4 Using SPEEDView
- What is SPEEDView?
- System Requirements
- Installation Instructions
- Starting SPEEDView
- The Program Instructions
- The Main Tab
- Options Tab
- Admin Tab
- Chapter 5 Basics of IP Addressing
- Basics of IP Addressing
- Glossary for Standard Data Communications
- Glossary for Standard Data Communications
- Software License Agreement

SPEEDLAN 9000 Installation and Operation User Guide
3-2 Using the SPEEDLAN 9000 Configurator
Initial Configuration of the SPEEDLAN 9000
Prerequisites
A PC that has the SPEEDView application installed and either Internet Explorer 5+ or Netscape
Navigator 4+. (For more information about SPEEDView see the separate PDF called, "SPEEDView
Quick Start Guide.")
Configuration of the SPEEDLAN 9000 is done through a web-based interface called the SPEEDLAN
9000 Configurator. In order to access the SPEEDLAN
9000 Configurator, you must first establish
TCP/IP communication between the SPEEDLAN 9000 and your PC. You can arrange the cabling in
one of two ways:
• If you have an Ethernet hub and two Ethernet cables, connect both the SPEEDLAN 9000
and the PC into the same hub.
• If you have an Ethernet cross-over cable, you can connect the SPEEDLAN 9000 directly to
the PC.
Once cabling is established, you must get both the SPEEDLAN 9000 and the PC on the same TCP/
IP network. You can do this in one of two ways:
• If your network has a DHCP server and you are able to configure it, you can enter the hard-
ware or MAC address into the DHCP server's settings. Then, have the DHCP server assign a
known IP address to the 9000.
• You can assign an IP address to the PC in the 192.168.69.0 network. The SPEEDLAN
9000 will default to 192.168.69.1, so you will have to choose a different IP address for the
PC.
The SPEEDLAN 9000 will attempt to obtain an IP address on its Ethernet port using DHCP when it
first boots, and if it cannot obtain one it will revert to 192.168.69.1 after a 30 second timeout. The
netmask will default to 255.255.255.0 (/24).
Before continuing you should verify that the PC has TCP/IP connectivity with the SPEEDLAN 9000.
The most common way to do this is to run 'ping’ 192.168.69.1 (or your DHCP assigned address) in
a console. This command is available in a Windows 9x DOS prompt, a Windows 2000 / NT / XP
command prompt, or any Unix console.