
User's Manual
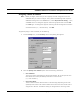
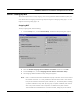
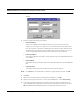
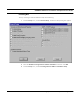
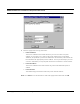

Table Of Contents
- Chapter 1 Introduction
- Product Description and Contents
- Product Features
- Chapter 2 Quick Start
- Rooftop and Tower Installations Warning
- Installation Steps
- Installation Diagrams
- Chapter 3 Hardware
- Drawings of Components
- SPEEDLAN 8500 ODU Hardware
- Antenna
- Restoring Factory Default Settings on the SPEEDLAN 8500 IDU
- Upgrading the Firmware
- Chapter 4 Overview of Configurator
- Installation and Setup
- Toolbar and Menus
- Chapter 5 Configuring SPEEDLAN
- General Setup
- Interface & Advanced Interface Setup
- The Setup Buttons
- Chapter 6 Bridging Setup
- IDU Setup
- Chapter 7 Setting Up the IP Addresses (IP Host Setup)
- Part I - Quick Overview of IP Addressing
- Part II - Setting Up the IP Address
- Part III - Setting Up NAT
- Chapter 8 IP-Router Setup
- IP Routing Setup
- Chapter 9 SNMP Setup
- SNMP Setup
- Chapter 10 System Access Setup
- System Access Setup
- Chapter 11 SNMP Monitoring
- Remote Statistics
- Interface Monitor
- Ethernet-like Interface Monitor
- SectorPRC Station Entries
- 11Mb RF Interface
- SNMP Monitor
- IP Monitor
- IP/TCP/UDP Monitor
- ICMP Monitor
- Chapter 12 Tables
- System Information
- IDU Learn Table
- IP ARP Table
- IP Route Table
- IP/TCP Connection Table
- IP/UDP Listener Table
- Local IP-Address Table
- Chapter 13 Analyzing Wireless Equipment
- Select Another Device
- Analysis Polling Interval
- Wireless Link Test
- Antenna Alignment
- Glossary for Standard Data Communications
- Glossary for Standard Data Communications
- Appendixes
- Appendix A Protocols & Ethernet Addresses
- Common Ethernet Protocols
- Common Ethernet Vendor Addresses
- Common Ethernet Multicast Addresses
- Common Ethernet Broadcast Addresses
- Appendix B Startup LED Patterns
- Startup LED Patterns

SPEEDLAN 8500 Series Installation and Operation User Guide
Setting Up the IP Addresses (IP Host Setup) 7-21
from the public. This means that the public will view only one public and valid IP
address.
5 Enter the appropriate outgoing information:
• Public IP Address
This is the IP address for the outside network. If you have more than one public
address, you can assign it to a node on a private network (One-to-One NAT). There-
fore, all requests for a particular IP address from the outside or public network will be
translated to the appropriate private IP address. This may be necessary if you have a
server or workstation (host) that needs to be connected to a remote network.
• Private IP Address
This is the IP address for the inside or private network only, which hides behind the Pub-
lic IP address.
• Public IP Mask
This address assigns the Subnet mask to the Public (Ethernet) portion of the SPEEDLAN
IDU.
• Private IP Mask
This address assigns the Subnet mask to the private network interface.
Note: Click Select to view the IP Mask List. Select the appropriate IP Mask and click OK.
6 Click OK.
7 After you have finished entering the appropriate information, click OK.
8 Now save the changes to the IDU or router. From the File menu, choose Save Config.
9 A message box appears informing you that the information will be saved to the IDU or
router. Click Yes . The Configurator confirms that the configuration has been saved. Click
OK. The SPEEDLAN 8100 & 8200 IDUs will automatically reboot at this point.