
User's Manual


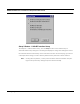
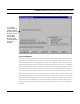
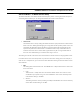
Table Of Contents
- Chapter 1 Introduction
- Product Description and Contents
- Product Features
- Chapter 2 Quick Start
- Rooftop and Tower Installations Warning
- Installation Steps
- Installation Diagrams
- Chapter 3 Hardware
- Drawings of Components
- SPEEDLAN 8500 ODU Hardware
- Antenna
- Restoring Factory Default Settings on the SPEEDLAN 8500 IDU
- Upgrading the Firmware
- Chapter 4 Overview of Configurator
- Installation and Setup
- Toolbar and Menus
- Chapter 5 Configuring SPEEDLAN
- General Setup
- Interface & Advanced Interface Setup
- The Setup Buttons
- Chapter 6 Bridging Setup
- IDU Setup
- Chapter 7 Setting Up the IP Addresses (IP Host Setup)
- Part I - Quick Overview of IP Addressing
- Part II - Setting Up the IP Address
- Part III - Setting Up NAT
- Chapter 8 IP-Router Setup
- IP Routing Setup
- Chapter 9 SNMP Setup
- SNMP Setup
- Chapter 10 System Access Setup
- System Access Setup
- Chapter 11 SNMP Monitoring
- Remote Statistics
- Interface Monitor
- Ethernet-like Interface Monitor
- SectorPRC Station Entries
- 11Mb RF Interface
- SNMP Monitor
- IP Monitor
- IP/TCP/UDP Monitor
- ICMP Monitor
- Chapter 12 Tables
- System Information
- IDU Learn Table
- IP ARP Table
- IP Route Table
- IP/TCP Connection Table
- IP/UDP Listener Table
- Local IP-Address Table
- Chapter 13 Analyzing Wireless Equipment
- Select Another Device
- Analysis Polling Interval
- Wireless Link Test
- Antenna Alignment
- Glossary for Standard Data Communications
- Glossary for Standard Data Communications
- Appendixes
- Appendix A Protocols & Ethernet Addresses
- Common Ethernet Protocols
- Common Ethernet Vendor Addresses
- Common Ethernet Multicast Addresses
- Common Ethernet Broadcast Addresses
- Appendix B Startup LED Patterns
- Startup LED Patterns

SPEEDLAN 8500 Series Installation and Operation User Guide
Configuring SPEEDLAN 5-3
• Enable Data Encryption
This optional feature allows you to encrypt wireless data transmissions on top of the
encryption provided by the radio. It provides 56-bit DES encryption. It is not shipped
standard as part of the IDU. If you did not purchase it when you originally bought the IDU,
it can be purchased later as a software upgrade. Data encryption is disabled by default.
Select the box labeled Enable Encryption to enable the encryption features. You will still
need to define at least one encryption key before your wireless traffic will be transmitted
using wireless data encryption. To do this, return to the drop-down menu presented when
you click on Setup. Now you will see a Data Encryption Setup item added to the menu list.
Select Data Encryption Setup. Click the DES Encryption button and enter an 8 digit
alhpanumeric string in the range of "a-z", "A-Z", and "0-9".
Examples:
Alphanumeric: a5F2z4wK
Warning: This setting must be set to the same value for the IDUs that will be communicating
together. Failure to set them to the same value will prevent any communications from
taking place. For example, in order to use a multipoint link, you must use the same
Encryption setting on the base station and on the CPE IDU.
• Enable Remote Bridging using IP Tunnels
SPEEDLAN IDUs support a special feature which will enable Ethernet packets of any
protocol type to be encapsulated in IP packets and sent to other IDUs (purchased from
Wave Wireless) for de-encapsulation. This method can be used to setup virtual Ethernet
LANs between several points using an IP network as the transport layer.
• Enable Advanced Network Monitoring Support
This option is not available at this time.
• Enable IP Security Counter Measures
This option is not available at this time.
• Enable Access Control
This option is not available at this time.
• Enable Digital Alarm Monitoring and Reporting
This option is not available at this time.
• *Enable Outgoing Network Address Translation
This option enables a company to map the private network’s IP address into one or more
global network IP addresses. This means outsiders will only view the single (or more if desig-
nated) IP network address assigned for global viewing on the Internet. For more informa-
tion, see Part III - Setting Up NAT, page 7-20.