
User's Manual
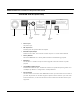
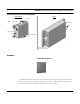
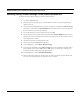

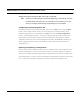

Table Of Contents
- Chapter 1 Introduction
- Product Description and Contents
- Product Features
- Chapter 2 Quick Start
- Rooftop and Tower Installations Warning
- Installation Steps
- Installation Diagrams
- Chapter 3 Hardware
- Drawings of Components
- SPEEDLAN 8500 ODU Hardware
- Antenna
- Restoring Factory Default Settings on the SPEEDLAN 8500 IDU
- Upgrading the Firmware
- Chapter 4 Overview of Configurator
- Installation and Setup
- Toolbar and Menus
- Chapter 5 Configuring SPEEDLAN
- General Setup
- Interface & Advanced Interface Setup
- The Setup Buttons
- Chapter 6 Bridging Setup
- IDU Setup
- Chapter 7 Setting Up the IP Addresses (IP Host Setup)
- Part I - Quick Overview of IP Addressing
- Part II - Setting Up the IP Address
- Part III - Setting Up NAT
- Chapter 8 IP-Router Setup
- IP Routing Setup
- Chapter 9 SNMP Setup
- SNMP Setup
- Chapter 10 System Access Setup
- System Access Setup
- Chapter 11 SNMP Monitoring
- Remote Statistics
- Interface Monitor
- Ethernet-like Interface Monitor
- SectorPRC Station Entries
- 11Mb RF Interface
- SNMP Monitor
- IP Monitor
- IP/TCP/UDP Monitor
- ICMP Monitor
- Chapter 12 Tables
- System Information
- IDU Learn Table
- IP ARP Table
- IP Route Table
- IP/TCP Connection Table
- IP/UDP Listener Table
- Local IP-Address Table
- Chapter 13 Analyzing Wireless Equipment
- Select Another Device
- Analysis Polling Interval
- Wireless Link Test
- Antenna Alignment
- Glossary for Standard Data Communications
- Glossary for Standard Data Communications
- Appendixes
- Appendix A Protocols & Ethernet Addresses
- Common Ethernet Protocols
- Common Ethernet Vendor Addresses
- Common Ethernet Multicast Addresses
- Common Ethernet Broadcast Addresses
- Appendix B Startup LED Patterns
- Startup LED Patterns

SPEEDLAN 8500 Series Installation and Operation User Guide
3-6 Hardware
Upgrading the Firmware
You will need to update your firmware if the old one is damaged or additional functionality has been
added. To upgrade the firmware, do the following:
1 Turn the SPEEDL AN IDU o ff.
2 Connect the PC to the IDU using a crossover Ethernet cable, or using 2 Straight-through
cables and a hub.
3 Under the Network Neighborhood on your PC, change the IP address to 198.17.74.195
and assign a Subnet Mask of 255.255.255.0. You will also need to remove any gateways
that were defined in your TCP/IP properties.
4 You will be asked if you want to re-boot your PC. Click Ye s .
5 On your PC, start the SPEEDLAN Configurator.
6 From the File menu, select Open Config. Then, select the appropriate .Bin file.
7 Then from the File menu, choose Upload Software. A dialog box will appear with an IP
address in it. Click Scan; this will bring up another dialog box with the IP Address of the
SPEEDLAN. This IP Address will be 198.17.74.254. At this point click OK, and confirm the
IP Address in the first dialog box is 198.17.74.254. Then, click OK again.
8 Next a menu will appear requesting a MAC Address, as well as a Passkey. You can only
receive these from Wave Wireless. You will enter these two variables and click the OK but-
ton. There will be a sequence of dialog boxes, which will warn you that you are about to
reload the Flash ROM with a new .Bin file. Click OK for all of them. This will cause the IDU
to reboot.
9 Allow the IDU to reboot normally.
10 The IDU has now been updated with a new .Bin file. You may now configure the IDU to
operate on your network.