
User's Manual

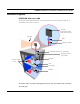
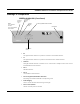
Table Of Contents
- Chapter 1 Introduction
- Product Description and Contents
- Product Features
- Chapter 2 Quick Start
- Rooftop and Tower Installations Warning
- Installation Steps
- Installation Diagrams
- Chapter 3 Hardware
- Drawings of Components
- SPEEDLAN 8500 ODU Hardware
- Antenna
- Restoring Factory Default Settings on the SPEEDLAN 8500 IDU
- Upgrading the Firmware
- Chapter 4 Overview of Configurator
- Installation and Setup
- Toolbar and Menus
- Chapter 5 Configuring SPEEDLAN
- General Setup
- Interface & Advanced Interface Setup
- The Setup Buttons
- Chapter 6 Bridging Setup
- IDU Setup
- Chapter 7 Setting Up the IP Addresses (IP Host Setup)
- Part I - Quick Overview of IP Addressing
- Part II - Setting Up the IP Address
- Part III - Setting Up NAT
- Chapter 8 IP-Router Setup
- IP Routing Setup
- Chapter 9 SNMP Setup
- SNMP Setup
- Chapter 10 System Access Setup
- System Access Setup
- Chapter 11 SNMP Monitoring
- Remote Statistics
- Interface Monitor
- Ethernet-like Interface Monitor
- SectorPRC Station Entries
- 11Mb RF Interface
- SNMP Monitor
- IP Monitor
- IP/TCP/UDP Monitor
- ICMP Monitor
- Chapter 12 Tables
- System Information
- IDU Learn Table
- IP ARP Table
- IP Route Table
- IP/TCP Connection Table
- IP/UDP Listener Table
- Local IP-Address Table
- Chapter 13 Analyzing Wireless Equipment
- Select Another Device
- Analysis Polling Interval
- Wireless Link Test
- Antenna Alignment
- Glossary for Standard Data Communications
- Glossary for Standard Data Communications
- Appendixes
- Appendix A Protocols & Ethernet Addresses
- Common Ethernet Protocols
- Common Ethernet Vendor Addresses
- Common Ethernet Multicast Addresses
- Common Ethernet Broadcast Addresses
- Appendix B Startup LED Patterns
- Startup LED Patterns

SPEEDLAN 8500 Series Installation and Operation User Guide
2-4 Quick Start
Step 4. Run the Cabling
The installation kit comes with two lengths of cable with ready made connectors that fit your
particular installation.
a) Attach the shorter cable from the ODU to the antenna, making sure the connectors are
screwed on tightly.
b) Attach the lightning arrestor to the end of the shorter cable.
c) Attach the longer cable to the lightning arrestor.
d) Drill the hole needed to get through the wall, being very careful not to drill into power con-
duits or other utilities in the wall.
e) Feed the cable through the wall and run it to the SPEEDLAN IDU.
f) Fasten all cabling securely to the pole and walls using clamps and zip ties. Do not run cable
over electrical devices such as fluorescent lights because these devices will interfere with the
operation of the IDU. Be careful when pulling or fastening the cable that unnecessary pres-
sure does not break your connectors.
g) Seal all outdoor connections with the black electrical tape and black sealant insulation putty
that comes in the installation kit. First, wrap the connectors tightly with the tape. Then, care-
fully wrap the connectors evenly with the insulation putty, making certain to leave no cracks
that would allow water to penetrate the seal.
Step 5. Ground the Antenna
a) Mount the lightning arrestor to a solid surface.
b) Run the grounding wire from the lightning arrestor to a proper ground source, such as a
grounding rod or roof ground wire.
c) Perform a bench test to make sure the equipment is working properly.
d) Seal the entire lightning arrestor with the black waterproof sealant insulation putty that
comes in the installation kit. Note: The lightning arrestor is NOT
NOTNOT
NOT waterproof.
Step 6. Connect the Wireless IDU to the Power Supply
a) Make sure the switch on the power supply is set to the proper voltage (110V or 230V AC).
b) Connect the power cord’s IEC 320 female outlet to the IEC 320 male power inlet on the
back panel of the SPEEDLAN IDU.
c) Connect the power cord to an external power outlet (110V or 230V AC).