
Installation Instructions


Page 5
Check frequently over the next 24 hours to ensure no leaks
are present
System Start Up
Filter Maintenance
Replacement Filter: H2O-F46 Lead
Reduction Filter
(6-Months - H2O-F46, EDP#7400356)
Remove completely and buy replacement.
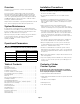
Step 1
- Turn on water supply at cold water angle stop.
Turn cold water faucet handle to the open position
to start the ow of water through the unit. Run 20
gallons of water through the unit in order to ush
out the normal black carbon nes (it will “sputter”
until the air is purged out) from the unit. A container
with a known volume can be lled to determine how
much water has ushed through the system. Initially,
the water may appear cloudy which is due to tiny air
bubbles and it will clear up shortly. Close the faucet
when nished.
Step 2 - Check for leaks. If you have any leaks, shut off the
water supply to your system, tighten any ttings then
turn the supply back on.
Step 1 - Turn off incoming water supply to the ltration unit.
Step 2 - Open the cold water faucet handle to relieve the
water pressure.
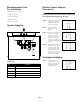
Step 3 - Remove the lter from the head by turning to the left,
then pulling downwards. Discard the old lter.
Step 4 - Remove lter cartridge from lter cartridge box inside
system box
Step 5 - To install new lter cartridge, with the lter label facing
approximately 45 degrees to the left, push the lter
into the lter head and twist it to the right until the
lter locks in and the label on lter is facing the front.
Step 6 - Follow start-up procedure.
NOTICE
Product Registration
To Register your product, please visit www.watts.com/pureh2o
and select “Register Now”. Registration is in accordance with
our Privacy Policy and Terms of Use. See our Privacy Policy
at - http://www.watts.com/privacy.asp
See Terms of Use at - http://www.watts.com/terms.asp
Troubleshooting
LEAKS BETWEEN THE SYSTEM HEAD ASSEMBLY AND THE FILTERS:
1. Turn off water supply to the lter and dispense water from
kitchen faucet until water and airow stops.
2. Remove cartridge and inspect O-rings to make sure they are
in place and clean.
3. Install cartridge, turn on water supply and check for leaks.
LEAKS AROUND THE FITTINGS:
1. Turn off water supply to the lter to relieve pressure.
2. While pulling the 3/8" plastic tubing with one hand, press in
on the collar around the inlet and/or outlet tting. Check to
make sure that the 3/8" plastic tubing is cut squarely and
that it is not scratched or crimped. If the 3/8" plastic tubing is
unevenly cut or scratched, cut off 1/2" to 5/8" and re-install
tubing.
3. Turn on water supply and check for leaks.
LEAKS ON THE KITCHEN FAUCET ADAPTER CONNECTION:
1. Turn off water supply to the lter to relieve pressure.
2. Locate the kitchen faucet adapter.
• If the 3/8" plastic tubing is leaking, follow the previous steps
("Leaks around the ttings").
• If the thread between the kitchen faucet adapter and
cold water line is leaking, tighten more securely. If leaking
continues, apply plumbers tape to threads and tighten.
3. Turn on water supply and check for leaks.
If leaks persist, or if there are other leaks on system, turn
off water supply. Contact Customer Service or Technical
Support Team at (888) 321-0500.
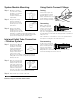
Mark the date the filter is installed on cartridge label
NOTICE
Filter
Replacement