
Installation Instructions


Page 3
HOT COLD
Recommended Tools
For Installation
• Small knife or tube cutter
• Variable speed drill
• 1/8" (3mm) drill bit
• Adjustable wrench
• Phillips screwdriver
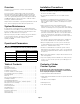
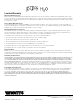
System Diagram
Parts List
Item Description
A System Head with Attachable Bracket
B H2O-F46 Lead Reduction Filter
C Kitchen Faucet Adapter
D 3/8" Plastic Tubing
E Mounting Screws not shown (x2)
A
B
C
D
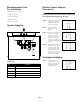
Kitchen Faucet Adapter
Connection
CAUTION
!
Water supply line to the system must be from the cold water supply
line only. Hot water will severely damage your system.
Cartridge Installation
Step 1 - Turn off the cold water
supply to the faucet by
turning the angle stop
valve completely off.
Step 2 - Open cold water
sink faucet to relieve
pressure.
Step 3 - Place a small container
under the cold water
angle stop valve to
catch any runoff water.
Disconnect the cold
water faucet supply hose
from the cold water angle
stop valve.
Step 4 - Hand-tighten the kitchen
faucet adapter to the
cold water angle stop
valve as shown. Next
hand-tighten the lower
end of the cold water
line onto the top of the
kitchen faucet adapter.
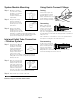
Step 1 - Line up arrow on
cartridge with unlocked
position on head, insert
cartridge and turn to
locked position.