
Install Instructions


3
Service, Replacement Parts and Maintenance
Series 007 and LF007
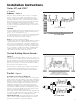
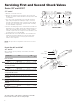
Servicing the First and Second Check Valves
NOTE: Before servicing, ensure supply water is turned off or
shutoff valves are in the closed position.
1. Remove the cover, then remove the retainer from the body
valve. The check valve modules can now be removed from
the valve by hand or with a screwdriver.
NOTE: For Series 007 and LF007 sizes
1
⁄2" - 2" (15-50mm),
the seats and springs of the first and second check modules
are not interchangeable. The heavier spring and smaller diam-
eter seat belong with the first check module. Series 007M1
sizes
3
⁄4" - 1" (20-25mm) and Series 007M2
3
⁄4" (20mm) have
interchangeable seats and springs.
2. The check seats are attached to the cage with a bayonet type
locking arrangement. Holding the cage in one hand, push the
seat inward and rotate clockwise against the cage. For
3
⁄4"
(20mm) Series 007M2/LF007M2 and LF007 pull apart seat
and cage. The seat, cage, spring and disc assembly are now
individual components.
3. The disc assembly may now be cleaned and reassembled or,
depending on its condition, it may be discarded and replace
with a new assembly from the repair kit. O-rings should be
cleaned or replaced as necessary.
4. Reassemble the check valve module in the reverse order.
Check modules are installed in the valve body with the seats
facing the valve inlet. The modules must be securely in place
before the retainer can be replaced. On the
3
⁄4" - 1" (20-25mm)
size, this retainer may have to be tilted slightly into place.
Replace cover.
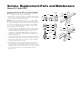
Cover
Cover
O-ring
Retainer
Body
First Check
Second Check
Seat
Seat
O-ring
Disc
Assembly
Spring
Check
Cage
O-rings
Check
Cage
Spring
Disc
Seat
Cover
Cover
O-ring
Retainer
Body
Second Check
First Check