
Troubleshooting guide


Page 14
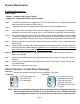
Membrane Replacement
Use a 5/8” wrench to remove the White Tube tting on the left side
of the horizontal membrane housing (end with one elbow).
Step 1
Step 2
Step 3
Step 5
Step 6
This reverse osmosis system contains a replaceable component (the RO membrane) which is critical to the efciency of
the system. Replacement of this reverse osmosis membrane should be with one of identical specications as dened by
Watts to assure the same efciency and contaminant reduction performance.
Membranes have a life expectancy between 2 and 5 years, depending on the incoming water conditions and the
amount the RO system is used. This reverse osmosis membrane is critical for effective reduction of total dissolved
solids (TDS). The product water should be tested periodically to verify that the system is performing satisfactorily.
Normally, a membrane would be replaced during a semiannual or annual lter change. However, if at any time
you notice a reduction in water production or an unpleasant taste in the reverse osmosis water, it could be time
to replace the membrane. Watts recommends replacing the membrane when TDS reduction falls below 75%.
A water sample may be sent to Watts for a free diagnosis of your membrane performance. To
send a water sample, use two (2) clean containers and ll ½ cup of tap water in one container
and ½ cup of reverse osmosis water in 2nd container. Clearly label each sample. Send the
samples to the address listed on the cover of this manual attention “Water Samples”. Watts
will test the water and mail or call you with the results.
Note:
Step 1
Turn off the incoming water supply to the RO.
Open the RO Faucet and allow water to drain from the tank until it
is completely empty.
Step 2
Removing the membrane:
Installing the membrane:
Follow the Start Up Instructions on page 11.
Remove the cap from the membrane housing by turning it counter
clockwise to loosen.
Remove membrane housing from the holding clips. Using a pair of
pliers, grip the PVC tube of the RO membrane and pull rmly on the
membrane to remove from the housing and discard.
Lubricate the O-rings on the new membrane with a water soluble
lubricant such as vegatable or olive oil. Insert the end with the two
black
Once membrane has been inserted into the housing you must take
your thumbs and give a rm push to properly seat the membrane.
Replace membrane housing cap and tighten.
After replacing membrane housing into clips, attach the white tube
to the tting on cap using 5/8” wrench.
Step 7
Step 9
Step 4 Repeat above steps to remove second membrane from the housing.
Step 8 Repeat above steps to install second membrane into the housing.