
Troubleshooting guide


Page 12
System Maintenance
Step 1
Step 3
Let system sit for one minute after the tank is empty to let the system depressurize before
attempting to remove lter housings. (See - How to Remove / Install Filter Housings below)
Items needed:
Turn off the incoming water supply to the RO at the feed water valve. (Follow the green tube
away from the RO system to nd the valve.)
Close ball valve on the storage tank and open the RO Faucet to depressurize.
Step 2
For more leverage you may leave the RO module attached to wall of cabinet. If you are unable
to access the module while it is mounted, remove it prior to changing lters. Remove stage
one housing (left side of module) by turning it clockwise (left), empty water, then discard lter.
Step 4
Six Month Maintenance
√ Stage 1 - Sediment Filter (part #: 104017)
√ Stage 2 & 3 - Carbon Block Filter (part #: 101009)
Remove stage two and three housing by turning them clockwise (left), empty water, then
discard lters.
Step 5
Step 7
Insert the new Carbon Block lter (White End Caps) into the stage 2 and 3 housing and
re-install housings.
Step 8
Step 9
Follow Start-up procedure on page 11.
Clean the lter housings with a mild soap solution and rinse with water. Check O-rings and
lubricate with water soluble lubricant. Vegatable or olive oil lubricants may be used. Petroleum
based lubricants (such as Vaseline®) must not be used.
Step 6
Before re-installing the lter housings back on to the system, check O-rings to make sure
they are still in place.
Caution:
Insert the new sediment lter (cloth like appearance) into the stage 1 housing and re-install
housing.
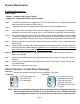
How to Remove / Install Filter Housings
When performing a lter change be sure to follow all of the steps.
To Remove:
1. Push housing up and
twist to the left
Important:
2
1
2. Pull downward
To Install:
1. Push housing into the
threaded housing cap.
1
2
2. Twist housing to the
right until seated and
pull down to make sure it
is secure.
Do not over tighten lter housings! Filter housing should be hand tightened up till the
lter cartridge seats to the lter bowl. The seal is made as soon as the lter cartridge
is pressed against the inside of the housing and is not improved by tightening more.
NOTE: