
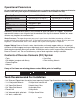
Troubleshooting guide


Page 10
Thread the plastic ball valve onto the tank tting. Do not apply Teon tape to tting.
Do not over tighten or the valve could crack.
Step 19
Tank Ball Valve Installation
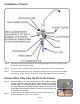
Yellow Tube Connection
Position tank in desired location. Insert the open end of the yellow 1/4” tube from the RO System
FIRMLY into the tank ball valve. Use a 5/8” wrench to tighten the white plastic nut securely.
Step 20
Note: Set the ball valve knob in-line with the yellow tube, this is the “open” position.
Locate the 1/4” yellow tube in the parts bag. Insert one open
end FIRMLY into the open tee tting attached to the LEFT side
of the nal stage lter. Use a 5/8” wrench to tighten the white
plastic nut securely.
Step 21
Blue Tube Connection
Step 22 Locate the 1/4” blue tube attached to the RO faucet. Insert the
tube FIRMLY into the 1/4” open tting on the RIGHT side of the
nal stage lter. Use a 5/8” wrench to tighten the white plastic
nut securely.
Reverse Osmosis Module Mounting
Step 23 Determine best location for the RO module to be mounted to allow for future system
maintenance. Using the mounting holes on the bracket, mark the location for the mounting
screws on the cabinet wall under the sink. In the parts bag, locate the two self tapping screws.
Using an electric drill with a Phillips bit, screw them into the cabinet at the marked location.
Hang the module on the screws using the mounting holes in the bracket
Caution:
This RO system is very heavy once lled with water.
Use wall/cabinet studs when mounting to prevent damage to mounting surface.