
User`s manual


Press the Advance Key ‰ once to go to the first se-
lection in the page. The parameter choices will appear
in the top display and the selection number will appear
in the bottom display. Use the Up ¿ or the Down ¯ key
to change the selected parameter in the top display. If
you do not want a parameter to appear for that location,
select [nonE]. To change the other 19 selections, press
the Advance Key ‰ to select a place in the page, [``P1]
to [`p20] ( [~P23] for the profiling version), in the
bottom display and use the Up ¿ or the Down ¯ key to
change the parameter selected in the top display.
Changes made to the Operations Page will persist
until changed by the operator or defaulted by full de-
faults or user defaults. User-defined parameters are not
over-written by default parameters if those features be-
come enabled. Only parameters supported by a con-
troller’s particular hardware configuration and pro-
gramming settings will appear.
Autotuning
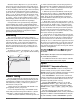
The autotuning feature allows the controller to
measure the system response to determine effective set-
tings for PID control. When autotuning is initiated the
controller reverts to on-off control. The temperature
must cross the Autotune Set Point four times to com-
plete the autotuning process. Once complete, the con-
troller controls at the normal set point, using the new
parameters.
To initiate an autotune, set Autotune [`Aut] (Oper-
ations parameters) to [``On]. A profile can’t be running.
Manual Tuning
In some applications, the autotune process may not
come up with PID parameters that provide the process
characteristics you desire. If the autotune does not pro-
vide satisfactory results, you will have to perform a
manual tune on the process:
1. Apply power to the Series SD and establish a set
point typically used in your process.
2. Go to the Operations Page, and establish values
for the PID parameters: Proportional Band = 5; Reset*
= 0.00; Rate* = 0.00. Autotune should be set to off.
3. When the system stabilizes, watch the process val-
ue. If this value fluctuates, increase the proportional
band setting until it stabilizes. Adjust the proportional
band in 3° to 5° increments, allowing time for the sys-
tem to stabilize between adjustments.
4. When the process has stabilized, watch the per-
cent power, [Po;ht] or [Po;Cl]. It should be stable ±2%.
At this point, the process temperature should also be
stable, but it will have stabilized before reaching set
point. The difference between set point and actual can
be eliminated with reset.
5. Start with a reset* value of 0.01 (99.99)** and al-
low 10 minutes for the process temperature to get to set
point. If it has not, double (halve) ** the setting and
wait another 10 minutes. Continue doubling (halving)
** every 10 minutes until the process value equals the
set point. If the process becomes unstable, the reset*
value is too large (small) **. Decrease (increase) ** the
reset value until the process stabilizes.
6. Increase Rate* to 0.10 minute. Then increase the
set point by 11° to 17°C. Monitor the system's approach
to the set point. If the process value overshoots the set
point, increase Rate* to 0.50 minute. Increase the set
point by 11° to 17°C and watch the approach to the new
set point. If you increase Rate* too much, the approach
to the set point will be very sluggish. Repeat as neces-
sary until the system rises to the new set point without
overshoot or sluggishness.
*Note: With the
[[UUnniitt]]
parameter set at
[[SSII]]
( Setup Page) Inte-
gral will appear in place of Reset and Derivative will appear in
place of Rate.
**Note: Integral is the reciprocal of reset. For Integral instead of re-
set, use the values in parentheses.
For additional information about autotune and PID
control, see related features in this chapter.
Inputs
INFOSENSE™ Temperature Sensing
Watlow’s INFOSENSE™ feature can improve tem-
perature sensing accuracy by 50%. Watlow’s INFO-
SENSE™ thermocouples and RTD temperature sensors
must be used together to achieve these results.
Each INFOSENSE™ “smart” sensor contains four
numeric values that are programmed into the SD mem-
ory. These values characterize Watlow sensors, for the
controller to provide greater accuracy.
Turn the INFOSENSE™ feature on or off with
INFOSENSE™ Enable [IS;En] (Setup Page). Set the
four numerical values supplied with Watlow’s INFO-
SENSE™ in the [IS;P1], [IS;P2], [IS;P3] and [IS;P4]
parameters.
The four numerical values are found on the tag at-
tached to the INFOSENSE™ sensor. Contact your Watlow
salesperson or Watlow authorized distributor for the pric-
ing and availability of Watlow INFOSENSE™ products.
Time
Temperature
Autotune begins
Process Set Point
Autotune Set Point
(90 percent of Process Set Point)
Autotune complete
Watlow Series SD ■ 58 ■ Chapter 10 Features