
Installation & Assembly

F
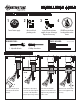
COUNTER
OR SINK
1.
2. 3. 4.
A
B
C
D
E
A
C
B
A
B
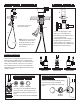
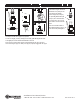
1. Before connecting supply hoses, ush
supply stops to clear any debris. Place a
bucket underneath stops and run water for 5
to 10 seconds. Turn water o.
2. Carefully position hot and cold supplies so
they will not interfere with other hoses.
3. Connect supply hoses (A) to supply stops
(B). DO NOT use teon tape or plumbers putty.
Turn water back on and check for leaks.
CONNECT THE PULL DOWN SPRAY HOSE
CONNECTING SUPPLY HOSES
Connect spray hose (A) to spray
connection hose tube (B).
NOTE – make sure spray hose (A) and
counter balance (C) are free to slide
up and down and are not in conict
with any plumbing components or
items under sink.
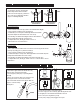
RED FOR HOT
BLUE FOR COLD
H C HC
COMPASS H/C COMPASS C/H FINISH MATCH
Waterstone faucets are designed for 3 dierent faucet positions.
Handle on left, front and right. Your faucet is congured for the
most common installation (see below). To reverse this and have the
handle positioned on the left, connect the hose for cold water to
the hot supply and the hose for hot water to the cold supply. This
will maintain the relationship of pulling the handle for hot water or
pushing for cold water.
HANDLE ON LEFT HANDLE IN FRONT HANDLE ON RIGHT
ORIGINAL FACTORY POSITION
MAY HIT BACKSPLASH
NEW ADJUSTED POSITION
CLEARS BACKSPLASH
H C
A
B
C D
A B E
E
G
C D F
F
HANDLE POSITION
OPTIONAL DECORATIVE BUTTONS
(TRADITIONAL ONLY - 3 INCLUDED)
OPTIONAL HOT COLD INDICATOR RING
(CONTEMPORARY ONLY)
1. To remove, place a small standard screwdriver in
the slot at the bottom of metal ring that surrounds
the handle button. Gently pry the button from faucet
handle.
2. To replace, position button and snap in with thumb.
1. To reverse, or remove Hot and Cold Indicator Ring,
unscrew the metal cap, remove ring and ip.
2. Slide ring back onto handle and screw metal cap
back on.