Operating Data Owner's Manual WARNING H0555100- FOR YOUR SAFETY - This product must be installed and serviced by authorized personnel, qualified in pool/spa installation. Improper installation and/or operation can create a hazard which can cause serious injury, property damage, or death. Improper installation and/or operation will void the warranty.
Jandy Ray-Vac® TABLE OF CONTENTS SECTION 1 SECTION 6 Safety Information Speed Adjustment After Cleaning 1A. 6A. Safety Instructions................................... 1 SECTION 7 SECTION 2 Ray-Vac Maintenance General Information 2A. Introduction.............................................. 2 General Maintenance.............................. 6 Troubleshooting Emptying the Ray-Vac Unit Emptying the Debris Compartment......... 2 8A. Troubleshooting.......................................
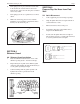
Water Pik Technologies, Inc. Page 1 SECTION 1. Safety Information 1A. Safety Instructions READ AND FOLLOW THESE SAFETY INSTRUCTIONS! PLEASE SAVE THESE INSTRUCTIONS Caution 1. Handrails which extend into the water must be removed or substituted with a figure four design so as not to obstruct the movement of the cleaner. 2. Ladders present a special situation requiring our special Ladder Guard Kit. If the ladder guard is not installed on the cleaner head, the unit can become entangled in the ladder. 3.
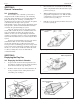
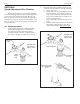
Jandy Ray-Vac® Page 2 SECTION 2. General Information 3. Place the Ray-Vac on its back. Locate the two (2) debris compartment latches. Rotate latch to open position (see Fig 2). 2A. Introduction 4. While holding the Ray-Vac head down, firmly grasp debris compartment cover. Pull the debris compartment cover up and away from the tail section to remove (see Fig 3). 5. Pull the screen up and away from the tail section to remove (see Fig 4).
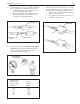
Water Pik Technologies, Inc. Page 3 6. If the pump(s) is on: put your hand over the hole in the back of the cleaner and force the water back into the cleaner. Use the whip hose to further remove any debris. SECTION 5. Remove Ray-Vac Hose from Pool Wall 7. If the pump(s) is off: use a garden hose to remove debris. 5A. Quick Disconnect 1. At the equipment pad, turn off all pool pumps. Make sure all moving parts are free of debris. Install the screen and debris compartment.
Jandy Ray-Vac® Page 4 SECTION 6. Speed Adjustment After Cleaning Energy efficient Ray-Vac pool cleaners plumbed with a Jandy Energy Filter and valve require adjustment of speed after each cleaning of the main filter. If your Ray-Vac operates with a booster pump, this adjustment will not be necessary. If you are uncertain whether your Ray-Vac operates with a booster pump, check with your pool professional. 6A. Speed Adjustment 1. 2. Check the Jandy Energy Filter bowl.
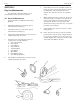
Water Pik Technologies, Inc. 3. Page 5 Check the Finger Screen (at rear of Hydro-Timer) If it is clogged, use the following steps to clear: a. Grasp and hold the Hydro-Timer while you unscrew the Finger Screen Case. b. Remove the Finger Screen and rinse it off. c. Place the Finger Screen back into its case and tighten onto the Hydro-Timer. 5. If the Ray-Vac sticks in an obstacle (i.e. corners, ladders, skimmers, etc.) it is possible to increase the pull out by changing the backup jet size. a.
Jandy Ray-Vac® Page 6 SECTION 7. Ray-Vac Maintenance 7. Check all hoses for wear. Carefully examine for holes, soft spots or worn areas. Be sure to check the Whip Hose, Silicone Pusher Hose, and Silicone hose with Sea Anchors (see exploded view). 8. When adding chemicals to your pool, allow your filtration system to circulate for at least four (4) hours to thoroughly mix the chemicals before operating the cleaner.
Water Pik Technologies, Inc. Page 7 SECTION 8. Troubleshooting 8A. Troubleshooting Problem Pool Cleaner stalls in corner. Cause Corner restricting movement of movement of Ray-Vac. Nose caster wheel jammed with debris. Increase backup. Solution No adjustment needed. Wait until backup jet pulls unit out of the corner. Clean or replace. See instructions under Speed Adjustment. Pool Cleaner stalls in skimmer. Skimmer opening is larger than Ray-Vac. No adjustment needed.
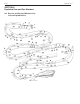
Page 8 SECTION 9. Exploded View and Part Numbers 9A.
Water Pik Technologies, Inc.
Page 10 9B.
Water Pik Technologies, Inc.
Page 12 9C.
Water Pik Technologies, Inc.
LIMITED WARRANTY These warranties extend only to the first retail purchaser of Laars and Jandy products that have not been moved from their original installation sites. Laars and Jandy warrants all parts to be free from manufacturing defects in material and workmanship as detailed below for the designated time frame, commencing from the date of installation. If any parts are found to have manufacturing defects, Laars and Jandy will provide replacement of such defective parts.