
Manual


www.waterchef.com
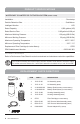
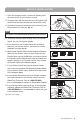
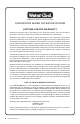
spout
facing
into sink
spout
facing
into sink
STEP 1
STEP 1
STEP 2
STEP 2
LEFT Placement
RIGHT Placement
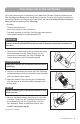
line up
FRONT
of Lid
Assembly
with hose
outlet
line up
BACK
of Lid
Assembly
with hose
outlet
6
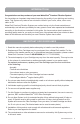
5. Determine which side of the sink
you want your System:
To position System to the LEFT side
of your sink: Orient the Lid Assembly to
Filter Housing as shown. (g. N, Step 1)
Once positioned, thread Lid Assembly
clockwise onto the Filter Housing until
tightened. (g. N, Step 2)
To position System to the RIGHT side
of your sink: Orient the Lid Assembly to
Filter Housing as shown. (g. O, Step 1)
Once positioned, thread Lid Assembly
clockwise onto the Filter Housing until
tightened. (g. O, Step 2)
6. Remove the Battery Shuttle from Lid
Assembly and replace your existing Battery with the
NEW Battery included with your Filter Cartridge, then
re-insert Battery Shuttle into Lid Assembly. (g. P)
The Intelligent Monitor
™
will ash GREEN, YELLOW
and RED ve times. This resets the rated capacity
counter to zero gallons. Do NOT remove Battery
Shuttle until it is time to replace the Filter Cartridge
again. Removing Battery Shuttle prematurely may
result in a loss of data.
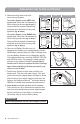
7. Position the System so that water will ow into
kitchen sink. Turn the cold water faucet “ON” and
pull the Diverter Pin. (g. Q) Water will begin to ll the
Filter Housing. Once water begins to ow from the
System, the Intelligent Monitor
™
will begin ashing
GREEN to indicate peak operational performance.
8. Allow System to ush into sink for 15 minutes.
This removes any ne, black carbon particles left
over from the manufacturing process, expel trapped
air and condition the Cartridge for normal use.
(This water may be used to water plants.)
N
O
REPLACING THE FILTER CARTRIDGE
P
Q
Repeat flushing procedure each time a new Cartridge is installed.
IMPORTANT