
User's Manual

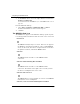

Table Of Contents
- WatchGuard® Firebox® X Edge User Guide
- Certifications and Notices
- Declaration of Conformity
- Notice to Users
- WatchGuard Firebox Software
- End-User License Agreement
- Copyright, Trademark, and Patent Information
- Limited Hardware Warranty
- Abbreviations Used in this Guide
- CHAPTER 1 Introduction to Network Security
- CHAPTER 2 Installing the Firebox® X Edge
- CHAPTER 3 Configuration and Management Basics
- CHAPTER 4 Changing Your Network Settings
- Using the Network Setup Wizard
- Configuring the External Network
- Configuring the Trusted Network
- Configuring the Optional Network
- Enabling the optional network
- Changing the IP address of the optional network
- Using DHCP on the optional network
- Setting optional network DHCP address reservations
- Configuring the optional network for DHCP relay
- Using static IP addresses for optional computers
- Adding computers to the optional network
- Requiring encrypted connections
- Making Static Routes
- Viewing Network Statistics
- Registering with the Dynamic DNS Service
- Enabling the WAN Failover Option
- Enabling External Modem Failover
- CHAPTER 5 Setting up the Firebox X Edge Wireless
- CHAPTER 6 Configuring Firewall Settings
- CHAPTER 7 Configuring Logging
- CHAPTER 8 Configuring WebBlocker
- CHAPTER 9 Configuring Virtual Private Networks
- CHAPTER 10 Configuring the MUVPN Client
- CHAPTER 11 Managing the Firebox® X Edge
- Viewing Current Sessions and Users
- About User Authentication
- Adding or Editing a User Account
- About Seat Licenses
- Selecting HTTP or HTTPS for Firebox Management
- Changing the HTTP Server Port
- Setting up VPN Manager Access
- Updating the Firmware
- Activating Upgrade Options
- Enabling the Model Upgrade Option
- Configuring Additional Options
- Viewing the Configuration File
- APPENDIX A Firebox®X Edge Hardware
- Index

Monitoring the MUVPN Client Connection
User Guide 139
Using Connection Monitor
The Connection Monitor shows statistical and diagnostic informa-
tion for connections in the security policy. This window shows the
security policy settings and the security association (SA) informa-
tion. The monitor records the information that appears in this win-
dow during the phase 1 IKE negotiations and the phase 2 IPSec
negotiations.
From the Windows desktop system tray:
1 Right-click the Mobile User VPN client icon.
2 Select Connection Monitor.
The Connection Monitor window appears.
An icon appears to the left of the connection name:
• SA tells you that the connection only has a phase 1 SA. A phase
1 SA is assigned in the following situations:
- for a connection to a secure gateway tunnel
- when a phase 2 SA connection has not yet been made
- when a phase 2 SA connection cannot be made
• A key tells you that the connection has a phase 2 SA. This
connection may also have a phase 1 SA.
• An animated black line underneath a key tells you that the
client is processing secure IP traffic.