
User's Manual
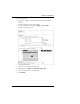
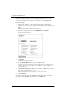
Table Of Contents
- WatchGuard® Firebox® X Edge User Guide
- Certifications and Notices
- Declaration of Conformity
- Notice to Users
- WatchGuard Firebox Software
- End-User License Agreement
- Copyright, Trademark, and Patent Information
- Limited Hardware Warranty
- Abbreviations Used in this Guide
- CHAPTER 1 Introduction to Network Security
- CHAPTER 2 Installing the Firebox® X Edge
- CHAPTER 3 Configuration and Management Basics
- CHAPTER 4 Changing Your Network Settings
- Using the Network Setup Wizard
- Configuring the External Network
- Configuring the Trusted Network
- Configuring the Optional Network
- Enabling the optional network
- Changing the IP address of the optional network
- Using DHCP on the optional network
- Setting optional network DHCP address reservations
- Configuring the optional network for DHCP relay
- Using static IP addresses for optional computers
- Adding computers to the optional network
- Requiring encrypted connections
- Making Static Routes
- Viewing Network Statistics
- Registering with the Dynamic DNS Service
- Enabling the WAN Failover Option
- Enabling External Modem Failover
- CHAPTER 5 Setting up the Firebox X Edge Wireless
- CHAPTER 6 Configuring Firewall Settings
- CHAPTER 7 Configuring Logging
- CHAPTER 8 Configuring WebBlocker
- CHAPTER 9 Configuring Virtual Private Networks
- CHAPTER 10 Configuring the MUVPN Client
- CHAPTER 11 Managing the Firebox® X Edge
- Viewing Current Sessions and Users
- About User Authentication
- Adding or Editing a User Account
- About Seat Licenses
- Selecting HTTP or HTTPS for Firebox Management
- Changing the HTTP Server Port
- Setting up VPN Manager Access
- Updating the Firmware
- Activating Upgrade Options
- Enabling the Model Upgrade Option
- Configuring Additional Options
- Viewing the Configuration File
- APPENDIX A Firebox®X Edge Hardware
- Index
Creating WebBlocker Profiles
User Guide 99
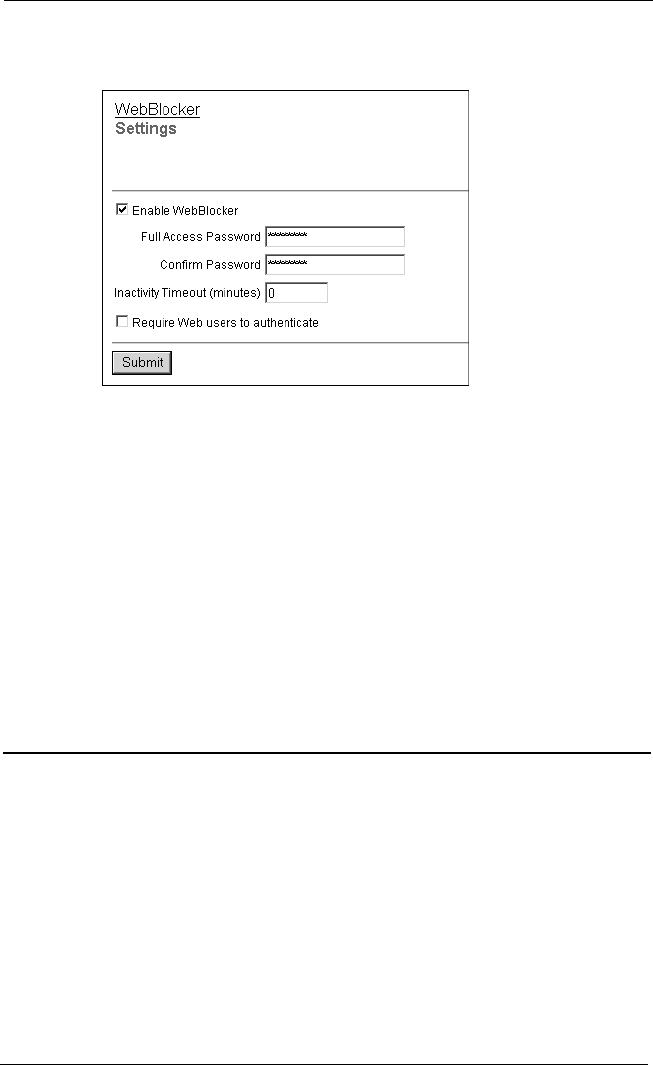
2 From the navigation bar, select WebBlocker > Settings.
The WebBlocker Settings page appears.
3 Select the Enable WebBlocker check box.
4 Type a password in the Full Access Password field.
Th
e full access password gives access all Web sites until the password
expires or the browser is closed.
5 Type the same password again in the Confirm Password field.
6 Type a number, in minutes, in the Inactivity Timeout field.
The inactivity timeout breaks Internet connections that are inactive for
the set number of minutes.
7 To make users authenticate for Internet access, select Require
Web users to authenticate.
8 Click Submit.
Creating WebBlocker Profiles
A WebBlocker profile is a set of restrictions you apply to users on
your network. You can create a profile that contains a restriction
that limits use for new employees with less than 90 days tenure.
Then create a less restrictive profile for users when the initial proba-
tionary period is complete.