
User's Manual
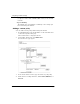
Table Of Contents
- WatchGuard® Firebox® X Edge User Guide
- Certifications and Notices
- Declaration of Conformity
- Notice to Users
- WatchGuard Firebox Software
- End-User License Agreement
- Copyright, Trademark, and Patent Information
- Limited Hardware Warranty
- Abbreviations Used in this Guide
- CHAPTER 1 Introduction to Network Security
- CHAPTER 2 Installing the Firebox® X Edge
- CHAPTER 3 Configuration and Management Basics
- CHAPTER 4 Changing Your Network Settings
- Using the Network Setup Wizard
- Configuring the External Network
- Configuring the Trusted Network
- Configuring the Optional Network
- Enabling the optional network
- Changing the IP address of the optional network
- Using DHCP on the optional network
- Setting optional network DHCP address reservations
- Configuring the optional network for DHCP relay
- Using static IP addresses for optional computers
- Adding computers to the optional network
- Requiring encrypted connections
- Making Static Routes
- Viewing Network Statistics
- Registering with the Dynamic DNS Service
- Enabling the WAN Failover Option
- Enabling External Modem Failover
- CHAPTER 5 Setting up the Firebox X Edge Wireless
- CHAPTER 6 Configuring Firewall Settings
- CHAPTER 7 Configuring Logging
- CHAPTER 8 Configuring WebBlocker
- CHAPTER 9 Configuring Virtual Private Networks
- CHAPTER 10 Configuring the MUVPN Client
- CHAPTER 11 Managing the Firebox® X Edge
- Viewing Current Sessions and Users
- About User Authentication
- Adding or Editing a User Account
- About Seat Licenses
- Selecting HTTP or HTTPS for Firebox Management
- Changing the HTTP Server Port
- Setting up VPN Manager Access
- Updating the Firmware
- Activating Upgrade Options
- Enabling the Model Upgrade Option
- Configuring Additional Options
- Viewing the Configuration File
- APPENDIX A Firebox®X Edge Hardware
- Index

Configuring Incoming and Outgoing Policies
User Guide 81
3 Find a standard policy, such as FTP, Web, or Telnet. From the
drop-down list adjacent to the Policy (Service) name, click Allow
or Deny. Repeat to add more policies.
4 For incoming policies, enter the IP address of the service host.
5 Click Submit.
Adding a custom policy using the wizard
You can add a custom policy using a TCP port, a UDP port, or a pro-
tocol.
1 From the Navigation Bar, click Wizards.
2 Next to Define a custom service... click Go.
3 Obey the on-screen instructions.
The Traffic Filter Wizard includes the following steps:
Step 1: Welcome
The first screen describes what the wizard does and the
information you need before running it.
Step 2: Basic Filter Definition
On the next screen, you specify basic information such as the
filter name and whether it is appied to incoming or outgoing
traffic.
Step 3: Protocols and Ports
Next, you specify the ports you want to assign to this traffic
filter.
Step 4: Source Hosts
On the next screen, you identify the IP addresses of the source
hosts to which this traffic filter will apply.
Step 5: Destination Hosts
In this step, you identify the IP addresses of the destination hosts
to which this traffic filter will apply.
Optional: Destination “service” host
This step appears if you have configured an incoming service to
allow traffic from the enternal network to pass through to the
trusted network. A local host on the trusted network must be
specified as the destination for all traffic matching this filter. This
host is referred to as a "service host" because it is generally used