Quick Start Guide
MobileAsset Pro Quick Start Guide © Copyright Wasp Barcode Technologies 2010 No part of this publication may be reproduced or transmitted in any form or by any means without the written permission of Wasp Barcode Technologies. The information contained in this document is subject to change without notice. Wasp and the Wasp logo are registered trademarks of Wasp Barcode Technologies. All other trademarks or registered trademarks are the property of their respective owners.
MobileAsset Quick Start Guide CONGRATULATIONS Congratulations on your purchase of MobileAsset! This guide will take you through the installation process and help you set up your software. Most of the information available here is also available in the Getting Started section of the online help.
Please note that Palm devices are no longer supported by MobileAsset. Do not install this software on your machine if you are still using a Palm device or if you have unprocessed transaction data on a Palm device. If you are transitioning away from Palm devices, prior to upgrading your software make sure each of the following tasks are performed: a. sync all Palm devices with MobileAsset, b. process all transactions from the devices, c. set the Palm devices aside where they cannot be accidentally used.
MobileAsset MobileAsset Quick Quick Start Start Guide Guide If you are installing a Windows Mobile/CE Device: a. Leave this MobileAsset install screen as it is and insert the ActiveSync CDROM (included in your MobileAsset package). Follow the prompts on the ActiveSync installation screens. You should install the files to the default directory. Note: At the end of the Windows Mobile/CE Device installation you may be prompted to reboot your computer.
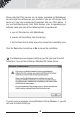
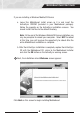
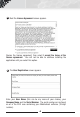
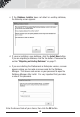
4 Next the License Agreement screen appears. Review the license agreement, then select I accept the terms of the license agreement. You will not be able to continue installing the application until you select this option. 5 The User Registration screen appears. Enter your User Name (this can be any name of your choice), your Company Name and the Serial Number. The serial number can be found on or in the DVD case containing your MobileAsset software (19 digit number).
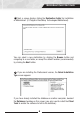
MobileAsset MobileAsset Quick Quick Start Start Guide Guide 6 Next, a screen displays listing the Destination Folder for installation of MobileAsset: (C:\Program Files\Wasp Technologies\MobileAsset). You can select a new destination by clicking the Browse button and navigating to a new folder, or accept the default location (recommended) by clicking the Next button.
The Database Manager checkbox should be selected if: • you are installing the Enterprise version and you will be maintaining assets for multiple companies from this machine, or • you are installing the Professional or Enterprise version and you will be backing up, restoring or maintaining the database from this machine. For information regarding the Database Manager feature please refer to the section Using MobileAsset to Manage Assets for Multiple Companies on page 32.
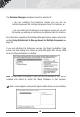
MobileAsset Quick Start Guide If you are going to use the software with a Windows Mobile/CE Device, select the checkbox. If you will not be using a mobile device, leave the checkbox blank. Click the Next button to continue. 9 After your mobile devices are successfully installed, the MobileAsset installation will continue. If you want to make changes to your destination folder at this point, click the Back button. If you are ready to install MobileAsset, click the Install button.
c. If the Database Installer does not detect an existing database, the following screen appears: d. If you are installing a new database, click the Install New button. If you are migrating a database, click the Yes button. Please see the section “Migrating an Existing Database” on page 11. e. If you are installing the Professional or Enterprise version, a screen appears asking you to create an access code for the Database Manager.
MobileAsset Quick Start Guide f. If you are upgrading from version 5, the Database Installer will detect your existing database, upgrade it (leaving your existing data intact) and create a backup both before and after the upgrade.
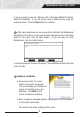
11 On Professional and Enterprise installations, the Computer Name screen is displayed once the Database Server install is complete. Important: Record your computer name before clicking the OK button. You will need to enter the computer name when you install your Client Tools. 12 Next you will see a series of install screens for third party applications, such as Crystal Reports. You do not need to do anything on these screens.
MobileAsset Quick Start Guide 15 A series of progress screens will appear as Labeler is installing. 16 After the entire installation process is complete, a screen will appear asking if you want to reboot your computer. Select Yes, I want to restart my computer now, remove any installation disks from their drives, then click Finish. Your system will reboot. MobileAsset and Wasp Labeler icons will appear on your desktop.
1 To migrate an existing database, you will need to detach the database from its existing location. To do this, open SQL Server Manager and navigate to the database. Right click on the database and select All Tasks > Detach Database. 2 The Detach Database screen appears: Click the OK button.
MobileAsset Quick Start Guide 3 When the database has successfully detached, the following message appears: Click the OK button. WaspTrackAsset will disappear from the database list. 4 Next, move the associated .mdf and .ldf files from SQL Server to a location on your local machine (or on the machine where you will be migrating the database).
5 During the database installation portion of the MobileAsset installation, you will see the following screen: Click Yes to complete migrating your database. 6 A screen will appear asking for the location of the mdf and ldf files: Navigate to the location where you moved the files, then click the OK button.
MobileAsset Quick Start Guide 7 Next a screen appears asking you to backup your database. Click Backup Database Now to accept the default backup location, or click Backup to Different Location to select a custom directory or name for your backup file. If you want to create the backup later, click Skip Backup. 8 Click the Finish button to close the Wasp Database Installer.
MobileAsset Pro Quick Start Guide Below is a brief outline of the steps required to setup your database. These steps should be done in order. The steps below discuss manually entering information into your database; however, much of this data can be imported. Importing data is discussed in this document in the section titled Methods of Data Entry (Importing vs. Manual Entry).
MobileAsset Quick Start Guide 5 Now you can enter the locations contained in each of your sites. From the Main menu, select the New icon, then click Location. Assets that you enter into your system must each be assigned to a Site and a Location within that site. Using the example above, within Warehouse 1, you might have three locations: Main Storage Area, Manager’s Office and Administrative Office. 6 The next step is optional. You can, if you wish, create departments for your company.
size specs, etc. of this particular type of computer. Then specific computers of the same type are assigned as assets to the IBM Laptop X6000 asset type. To create Asset Types, from the Main menu, select the New icon, then click Asset Types. 10 This step is optional. You can create different categories to which you can assign assets. This is another way to further define your assets. You can add categories directly from the New Asset Type screen, if you wish.
MobileAsset Quick Start Guide Import Order: A. Vendors (optional) B. Manufacturers (optional) C. Depreciation Classes (optional – import if you will be calculating depreciation.) D. Asset Types (required) E. Departments (optional – if you will be importing employees and wish to assign them to specific departments, you must import the departments prior to importing the employees.
STEP 4 PRINT ASSET TAGS Asset Tags should be printed and attached to each asset in your database. When you created your Assets, remember that you entered a number or code for each asset in the Asset Tag field of the New Asset screen (if you manually entered your assets) or in the Asset Tag column (if you imported the data). Now an actual tag should be printed that contains the Asset Tag number or code and (usually) a barcode for quick identification and tracking. These tags should be affixed to each asset.
MobileAsset Quick Start Guide Synchronize the data you have collected on your mobile device back to the PC. If you have chosen not to install a mobile device, you will need to do this audit manually by physically checking each asset tag attached to an asset and comparing against the database. STEP 6 BEGIN MANAGING YOUR ASSETS You have now successfully setup MobileAsset.
MobileAsset Pro Quick Start Guide FOR PROFESSIONAL EDITION INSTALLATION MobileAsset Pro Edition takes advantage of your existing TCP/IP network to allow up to five MobileAsset Client workstations to access a single database located at the MobileAsset Server. The Client software may optionally be installed on the same machine where the MobileAsset Server database is installed. INSTALLATION MobileAsset Pro ships with one Server license and five Client Licenses.
MobileAsset Quick Start Guide Minimum Client Configuration Recommended Client Configuration 800 MHz CPU 1.0+ GHz CPU 512 MB of RAM 1 GB of RAM 200 MB of disk space with 700 MB of 200 MB of disk space with >1.
MobileAsset Pro Quick Start Guide 1 Server and 5 Clients When selecting the MobileAsset database server configuration shown below, uncheck the Client Tools option on the Select Installation Type screen, and only the Database Server will be installed on this machine. Select Installation Type screen: * For the client only machine refer to the Client Only section below.
MobileAsset Quick Start Guide Remember that there are only five Client licenses, so you might want to deselect the Client Tools component if you would rather deploy all of your Client licenses on machines other than this Database Server machine. If you deselect Database here, you will not be installing the server. * Client Only The Client Tools component of MobileAsset Pro Edition can be installed once a MobileAsset Server has been installed and is running.
MobileAsset Pro Quick Start Guide Note: For information regarding the Database Manager option, please refer to the section Using MobileAsset to Manage Assets for Multiple Companies on page 32. The Computer Name screen is displayed once the Database Server install is complete. Important: Record your Computer Name before clicking the OK button. This name must be known when you perform your Client Tools installation. USING THE MOBILEASSET CLIENTS The Client licenses are “Fixed”.
MobileAsset Quick Start Guide Function Performed on a Client Affects All Users, Everywhere Change Company Information X Restore the database X Add or change Security Privileges X Import Data X Edit Field Names X Set Default Working Site Affects Any User Who Logs On to this Client Affects Only a Specific User X Change any Option X All Asset Management functions X Change Labeler Labels X Change Report Filters X Mobile Device Database Filter Criteria X See the MobileAsset Online Help
MobileAsset Enterprise Quick Start Guide FOR ENTERPRISE EDITION INSTALLATION MobileAsset Enterprise Edition takes advantage of your existing TCP/IP network and your current installation of MS SQL Server to allow an unlimited number of Client workstations to access the MobileAsset Database. The Client software may optionally be installed on the same machine where the database is installed.
MobileAsset Quick Start Guide Minimum Client Configuration Recommended Client Configuration 800 MHz CPU 1.0+ GHz CPU 512 MB of RAM 1 GB of RAM 200 MB of disk space with 700 MB of 200 MB of disk space with >1.
MobileAsset Enterprise Quick Start Guide 2 If you have more than one database instances installed, they will be listed under the server. NOTE: The Integrated Security check box is used to specify that the SQL Server Wire Protocol driver request a secure (or trusted) connection to SQL Server. SQL Server uses integrated login security to establish connections using this data source, regardless of the current login security mode at the server. Any login ID or password supplied is ignored.
MobileAsset MobileAsset Quick Quick Start Start Guide Guide 4 The same Wasp Database Installer windows will appear that display in step 10 of the Install the Software section of this document (page 7). Note: For information regarding the Database Manager feature please refer to the section Using MobileAsset to Manage Assets for Multiple Companies on page 33. If the Database has been previously installed, the installer will upgrade the database to the latest layout.
UPGRADING FROM MOBILEASSET ENTERPRISE VERSION 5 TO VERSION 6 1 The MobileAsset Installer should be run on each client machine to upgrade the software. 2 On the Database Server Machine that houses your database, you should run the installer as usual. On the Select Installation Type screen, select Database only. If the machine that houses your database also contains a client program, you will need to perform Step 1 and Step 2 on that machine.
MobileAsset Quick Start Guide USING MOBILEASSET TO MANAGE ASSETS FOR MULTIPLE COMPANIES The Enterprise version of MobileAsset allows you to create databases for multiple companies. This means that if you have two separate entities for which you want to maintain assets, you can install one instance of MobileAsset, then create two databases - one for each company. Remember that a database is the repository for all information about your company.
does not consume a license if it is installed on a machine that does not have the client on it. To run the Database Manager, click Start > All Programs > Wasp > MobileAsset > Database Manager. Again, you will need to know the access code you created during the installation to run the Database Manager. Use the Online Help built into the Database Manager to learn how to add and manage database (click the Help button or press F1 on your keyboard when the Database Manager is running).
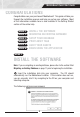
MobileAsset Quick Start Guide MANUAL START PROCEDURES 1 Place the CD into the CD ROM drive on your computer. 2 Right mouse click on the Start icon and click the Explore option. 3 Click on the disk drive location containing your Installation CD to expose the CD contents. 4 Locate the setup.exe program and double click on it. The installation process will begin.
MobileAsset Enterprise Quick Start Guide 36
1400 10th Street Plano, TX 75074 Phone: 214-547-4100 • Fax: 214-547-4101 www.waspbarcode.