
User guide

30
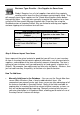
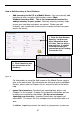
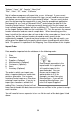
Labels List will appear. Simply highlight the label you want to create, then click
the OK button. W asp Labeler will automatically open allowing you to print the
selected labels. To create a custom label, highlight the Create New Label option
on the Labels List.
There are some pre-built labels you can create directly from InventoryControl
(Main Window > Labels).
When saving new labels you've created with W asp Labeler, they will be listed
with the default names shown on the Labels List. The files will automatically
save to the .LAB files in the folder called Labels in the folder where you installed
the software. If you are unsure where this is, just use the Windows Find (or
Search) command to locate the folder containing the file InventoryControl.exe,
then save your .LAB files in the Labels folder beneath it. You can change the file
name and/or save to a different location, if needed.
Step 8: Add Inventory to Your Items
After you have added items to your database, you are ready to add inventory, or
quantity to those items at specific locations. Adding inventory is often referred to
as receiving inventory. You can think of this step as stocking the InventoryControl
program with the inventory that is in your warehouse. Remember that inventory
is not the same thing as items, even though inventory is made of items. Adding
inventory to an item means you are adding quantity to that item.
When you are adding inventory, you will enter information specific to your
inventory such as Location, Quantity and Cost as well as specific tracked by
information such as serial numbers, date codes and pallet codes. Each time you
add inventory for an Item, the transaction is stored separately in InventoryControl
allowing for multiple Locations and cost averaging
.
1. Highlight the
label you want to
create, then click
the OK button.
2. Wasp Labeler
opens allowing you
toaddinfotoand
print the selected
label.
Figure 18