
Owners manual

WARN® INDUSTRIES PAGE 9 83138A1
Installation continued
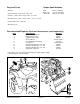
8. Make sure the bucket is set in the straight position
to the tube assembly.
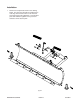
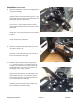
Install the latch mounting bracket (Figure 9). This
bracket will be used in place of the plow latch and
will prevent rotation of the bucket.
Use the 5/16” x 3/4” bolt with washer in this kit
and the M10 shoulder bolt from the plow to secure
the bracket.
Install 5/16” x 3/4” socket head screw, as shown in
Figure 9.
Torque all fasteners at this time.
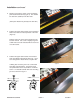
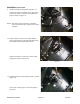
9. Make sure the plow blade stop block is set in the
“B” position (Figure 10).
Pull back on the plow blade and use a wrench to
insure that the block bolt is tight.
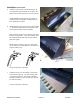
10. Install the latch and latch return spring (Figure
11). Use the short 3/8”x 1/2” shoulder bolt and
coil spring from this kit to secure the latch to the
mounting bracket. Use one of the thin 5/16-18
locking jam nuts to fasten in place.
Tighten this bolt all the way to compress the coil
spring against the latch. The latch may need to
be moved up and down a few times to allow it to
move freely under the coil spring.
Install the latch return spring after the latch has
been installed and is moving freely.
Figure 9
Figure 10
Figure 11